{Feel Free to download this for yourself- personal use only} |
Tuesday, January 31, 2012
{Quote Printable}
Labels:
tutorial
Monday, January 30, 2012
{Guest Post}
Friday, January 27, 2012
{Freebie Friday}
Make sure you take advantage of this week's Freebie from Share the Memories:
This
weeks freebie reminds me of renewal, peace, new life in the spring, and a little bit of St. Patricks Day! This could also be very pretty for wedding or anniversary pages. Maybe even some heritage pages using those really old black and white family photos.
You will have one week to download this freebie.
You can download this weeks freebie by clicking here.
This Freebie contains the 2 Quick Pages shown and all the pieces (papers and elements) used to create those Quick Pages!
(The elements and QuickPages are.png and the papers are .jpg format.)
Remember, I will be sharing a new freebie every week.
If you have not purchased the software yet, you can do so here:
Use my code for a discount:
CODE: STMMMS72256
(I do get compensated if you use this)
They have a great social media presence and support group:
Tutorials on how to use the software and tips can be found here.
Labels:
Freebie Friday
Thursday, January 26, 2012
{Canvas photo gift}
Here are the materials I used:
- one 8x10 canvas out of a 2-pack from Hobby Lobby
- black tempera paint
- sponge
- spray adhesive
- mod podge
- scissors
- and of course a picture of choice.
You may notice that the picture I used has been edited. I had asked my sister and brother-in-law to send me their current favorite picture of their daughter and some words, phrases, nicknames, or whatever that described her or meant something to them right now. Let me tell ya, that was such a neat thing to experience that relationship. So I just made the picture black and white and added these special words in various colors and fonts around her.
Next I put the black paint on my canvas and spread it around with the sponge. I wanted it to look a little rough and some white peek through. Then let it dry.
I trimmed the picture down and sprayed the back with Spray adhesive to figure out where to place it on the canvas and hold it while I added the mod podge.
So I spread the Mod Podge on in thin layers with a sponge. This gave it a matte finish. You have to let it dry and give it several layers of the mod podge to seal it well.
Labels:
crafts
Tuesday, January 24, 2012
{Woohoo its the work week} :-)
(source) |
Monday, January 23, 2012
Making a Banner
So I wanted to make a banner to use for my son's birthday party. I knew with all the craft stuff I have around the house I could make one without any extra costs. So here goes my little step by step guide for making it.
I started with different colors of paper. Primary colors that worked well with our tractor themed party. Basic sized 8.5x11 size and cut them in half.
Then I took one top corner edge and lined it up, ballparked it, to create a bottom point on one side.
This is what it looked like after the first cut.
Then it was easy to line up the other top edge to the bottom point I created with my first cut. Can you see where they are lined up down the cut line?
This is what it looked like after that second cut. See how simple that part was! No template needed.
Here is a picture of a few more colors cut.
So, now how to connect them.....I knew pretty quick I wanted to use eyelets. So I broke out my eyelet stash and tools. I ended up deciding I needed to do the eyelets on the ends so I could string ribbon through it to hang.
So then I switched to brads for the middle connections.
You just push them through both layers of papers.....
Then flatten it...
I used the Stampin' Up brads since it is what I had.
And well, here is the result. I know it doesn't look like much here or very big, but let me show you how it looks hanging up behind his high chair. It is twice as long as the photo above.
What do you think?
Labels:
tutorial
Wednesday, January 18, 2012
{Girly party plans}
I am a planner. I may not finish all the details until the last minute, but I start planning well in advance. I have not always been this way. I became this way after having kids. I am 9 months pregnant with my 3rd. This is my 2nd daughter, and my poor son is stuck in between 2 girls. This little girl is due a month before my older daughter's 5th birthday. So I definitely need to get some planning underway for her upcoming birthday party.
I feel like 5 is such a big deal of a birthday! I mean, its a big step, you start Kindergarten, work on tying shoes, help more with chores, get an allowance, can ride a bus, are going somewhere with out your parents or some form of constant supervision. It kinda scares the bejeezus outta me!! My baby girl is growing up.
And she is so grown up. The phrases she says, the way she dresses and carries herself. She wants to help us cook and is a HUGE help with her brother. Seeing her write her name and draw pictures (that look like what she says it is lol) just blow my mind. How can this even be possible, ya know!
So I figure we need to do some "grown-up girl" stuff. I am going to take her for her first mani/pedi. We are going to have a formal tea at a tea room, or if we can't find one that does what I am envisioning, we will wait to we visit my sister in Richmond and she and I will take my daughter to the Jefferson Hotel for High tea. In that case I will take her to the melting pot for a cheese/chocolate course- my husband doesn't want to miss that part. :-) Any other ideas for grown-up girl stuff I can do with her? I know to me, this already seems like a lot for our budget, but we are also going to Orlando in May and we will go to Disney for at least 1 day (she's gone every year, so we just want to hit the highlights) and that is what we are asking the rest of the family to contribute towards instead of buying toys and clothes that she doesn't need anymore of.
But you know, every child wants a party with their friends. So we will do something basic with just cake and ice cream and let the kids play. Well she wants a Princess Tea party. She has several boy "friends" so not sure how this is going to go over with inviting them to a girlie girly girl party, cause they are in the yuck girl stuff stage, so we may be adjusting it from a full on girly party and roll with it. SO as I was playing around with making cupcake topper images as I did for my son's tractor themed party (you just can't find Allis Chalmers and Farmall toppers like you can John Deere) I found this to be easy to make.
Tuesday, January 17, 2012
2011 Top Posts
I have enjoyed seeing everyone's posts about what the top viewed posts they had done for the year. SO, I took a look at mine. It was very interesting to see which posts were the most popular. Looks like the very detailed posts with good step-by-step directions and pictures, especially the before and afters have been the most popular. What do you think? Why do you read this blog and what would you like to see more of?
|
|
|
|
|
|
|
|
|
Labels:
review
Monday, January 16, 2012
Mason Jar wine glass.....
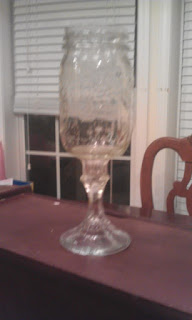
I had a quick fun gift to make for a Christmas party, and had seen these wine glasses at the Southern Christmas Show. I am already going to apologize for the poor pictures my phone took. I put it together quickly one night and took pics as I threw it together.
Here is the step by step:
These are the materials I used.
- medium sized mason jar (quart) already on hand
- cheap candlestick from thrift store .50
- DAP adhesive- already on hand.
just another view of it.
I flipped the jar over, centered where I wanted the candlestick to go.
Added the adhesive around it.
held it in place for a little while and let it sit overnight.
and this was the final product.
Friday, January 13, 2012
{Sale at Michael's this weekend}
I don't get compensated for this, just great deals I try to hit up when they have them, thought I would share.
we use yarn for lots of kid projects, and this makes it easy for me to consider trying to knit/crochet without worry of messing up lol.
Great deal on scrapbooking paper!
I always buy some of these flowers when they are this cheap.
Great Frame price!! with matting!!
T-shirt deal! woohoo! I have several projects that use these.
Hope these deals help you with some of your projects!
Labels:
deals
{Freebie Friday}
I am going to start a weekly contest to go along with the freebies posted on Friday. I will have another free designer pack available each week that will go to the winner of each week's contest. I want you to share with me a page you have made using one of the freebie's given out on this blog. I want you to see how easy it is to use. Hoping soon to be able to add some extra monetary prize along with that as well, but that will depend on how successful this weekly contest is. Email entries to begintocraft@gmail.com.
I am hoping to post all entries and use the most viewed or some type of vote as the decision.
Make sure you take advantage of this week's Freebie from Share the Memories:
This weeks freebie is bright and cheery. Makes me think of Spring being right around the corner. This is a stretch for me. It's not the typical colors I gravitate to as last weeks freebie was.
Well anyway, Be sure to grab it up while you can. You will have one week to download this freebie.
You can download this weeks freebie by clicking here.
This Freebie contains the 2 Quick Pages shown and all the pieces (papers and elements) used to create those Quick Pages!
(The elements and QuickPages are.png and the papers are .jpg format.)
Remember, I will be sharing a new freebie every week.
If you have not purchased the software yet, you can do so here:
Use my code for a discount:
CODE: STMMMS72256
(I do get compensated if you use this)
They have a great social media presence and support group:
Tutorials on how to use the software and tips can be found here.
Labels:
Freebie Friday
Thursday, January 12, 2012
I won an award!
I am tickled to death to win another award. This one is special because it is specific to what I blog about and comes from an online magazine. I am still so happy about this. It makes you feel like the time you put into sharing your steps pays off. I realize not everyone has time to comment, though it is highly appreciated.....hint hint. It is nice to get feedback as to what you are doing well. Encouraging to continue doing it. So Thank you to Be@Home and Become.com. I am so thankful for this award!
Be sure to show them some love!
The feedback I received was this:
Be sure to show them some love!
The feedback I received was this:
I like that you showcase so many different projects that give great tips and ideas. Your designs are creative and you give great tips for gifts and a wide variety of events and holidays!
I’m an editor at Be @ Home, which is part of Become.com’s blogging network, and thought your site was particularly exceptional. I wanted to give you a button for your site for being an “Editor’s Choice.”
Wednesday, January 11, 2012
Quick kids project
Lil man is just too little to try this with yet, but Spencer and her friend H-man did great.
All I did was get those cheap wood Christmas decorations from Michaels. These are not the ornaments ones though they look like ones, they just don't have the hole in them. I add that with my dremmel tool.
I put paint in separate areas of egg carton. and let her have at it.
She has progressed so good in her design of them.
She gets really into it now. Love the designs she does. Her plastic cup that she rinses her brushes off in.
She even added glitter to them. She did so good. I am so proud and I love hanging these on my tree every year.
Her and her buddy H-man have so much fun doing crafts. I have some to give his mommy too.
Now being Angels. They did so good.
H-man showing off his projects.
My sweet girl showing off her work too!
Well this was just a quick post about a quick project. I started this when my daughter was almost 2. We started with markers and these ornaments. I just put newspaper on the floor and let her go at it. So interesting to see how she has grown. We also use these for her to give as gifts to friends, grandparents, aunts/uncles. I like teaching her to give and to give homemade things. These are definite treasures.
Subscribe to:
Posts (Atom)
Deals:
(clicking links helps fund this blog)