Monday, April 30, 2012

{Great Outdoor Updates}


It has been so nice out that I cannot help but spend my time working out there. So I had some good feedback on my Front Porch Updates so I wanted to share with you what my garden beds look like. Now I took these pictures from the front porch looking down.You will notice that there is a significant difference in how much light each side gets. 


My Begonias and yellow daylily in their new home. on the right side of my porch- towards the animals.


One of my ferns on the animal side- most daylight.


 The left side of the porch holds another fern and a hanging basket


 Close-up of the hanging basket has more Begonias and pink pansies


 This is at 10 in the morning and you can see there is already a good bit of shade towards the back where the ivy is growing. Does anything else grow in this much shade? I am going to try to get a few bushes or something to bring in some color and height back here. Everything we have only really is out during the spring/summer. I need some things to carry us into fall and winter.


 Up from there in the front of the porch on the left side of the steps are mostly hostas and a few other flowering plants. This section gets a bit more sunlight but not much after noon.


 Another shot of that front left side. The planter holds some strawberries. And there is a small bush behind it.


 Standing at the steps looking to the left this is what you see.


Now from the steps looking on the front right side is again mostly hostas, some flowers, a grapevine that sprung up on its own. We will be putting some lattice to close off under the steps.


 Looking further to the right of the steps. It doesn't look too bad. It will look better once it starts flowering but again. Need something for fall/winter. This side gets almost full sun all day. The sun rises on this side and goes diagonally over the house from here.


 Directly to the right here is some periwinkle which is doing very well. The window here is to our bedroom. I would love to open our windows some nights but hubby is afraid someone will climb in. So I am thinking of some prickly shrubbery. Any ideas?


 Directly beside the porch is our blueberry bush and some flowering plants.

 Then back in front of that

And finally the front right side again.

So, did I lose you on that nice little tour. I know I should snap a pic facing the house so you can see how it is laid out in one piece. I will try to get that up and posted too. I would love your ideas and feedback on plants in this area.

Pin It

Friday, April 27, 2012

{Freebie Friday}


This weeks freebie is abso-freakin-adorable! There will be a different one available next week. I really had a hard time deciding which one to share with you first. I ended up choosing this sunny cheery yellow!

All of the Friday Freebies will now be MyMemories Suite Compatible.  What does that mean??? It means that you can now load the freebies directly into your MyMemories Suite Software, and then completely customize them with any paper and embellishments that you have. Sweet, huh?


You have one week to download this freebie. Click here to get it now


Flower Card Tutorial
Using MyMemories Software to Customize your Flower Card
 
  1. Download template file and install it into your software
  2. Using MyMemories Suite, choose Create Album From Designer Template and find your project
  3. Now you can print and enjoy the provided template, or customize it with your own papers and embellishments.

TIP:
You can right-click on the white guide and lock it in place to keep it from moving while you are working. Make sure this is the top layer of your project before printing.

Instead of adding the paper as a background paper, you can add it as an embellishment so that you can move the paper around.  This is especially useful when using papers with stripes or circles, so you can decide which part of the paper you want to use.

Once it is added as an embellishment, you can now select the paper and move it into the position you want it. 


Just SAVE and PRINT on cardstock!


This post is already long, a tutorial on making the flower will post shortly.

Remember, I will be sharing a new freebie every week.

If you have not purchased the software yet, you can do so here:


Use my code for a discount:

CODE: STMMMS72256
(I do get compensated if you use this)


They have a great social media presence and support group:


Tutorials on how to use the software and tips can be found here.


Pin It

Thursday, April 26, 2012

{Placenta Encapsulation}-my experience


I wrote before I delivered #3 that I planned to utilize placenta encapsulation based on my PPD experience with #2. It took some convincing with my hubby. I also had to talk to both sets of parents because after all I was going to have a c/s and the grandparents would be taking care of our kids at our home. The encapsulation process is done in your home and needs to start within 48 hours of delivery if possible- and I would still be in the hospital, so they needed to be prepared for what would be happening, and one of them would have to take it home for us. LOL that was quite a conversation, let me tell you. 

Go ahead and warn you - there are pictures of my products in this post, including my tincture so beware if you are squeamish. 

Ok so a little bit about my experience this time around. I was scheduled for a c/s at 39 weeks. I had easy pregnancies with my other 2, but this one was different all around. I got a virus at christmas that put me into heavy contractions that slowed down after I could keep fluids down. Then in January I got another virus that dehydrated me first putting me into heavy contractions and sending me to get fluids at the hospital. At 37 weeks hubby and I were trying to finish preparations around the house and do some more freezer cooking and I went into heavy contractions again while walking through the store. We went home to rest so they would go away, but they did not (after drinking lots of water, lying on my side and doing slow breathing). So we called the dr.

Dr had us come on in. Now I have never been into labor on my own before. #1 water broke but labor never started, #2 scheduled c/s and #3 has a mind of her own- I knew we were having a baby that day, but hubby thought we were going to get fluids and go home. He packed up the stuff we needed in the car anyway while we waited for my mom to arrive to watch the kids. I was in so much pain I could not sit or lay down comfortably. I had to stop several times going to the car. I am so relieved not to have had to go through that previously lol. I got sick in the car twice on our way there, but all was well and we got to the hospital and hooked up. My least favorite Dr was there, not the one that performed my other 2 c/s or that we had discussed encapsulation with but it was in our chart and we had our forms and approvals.

After getting there and while waiting for the Dr to come in, I suddenly spiked a fever and baby's heartrate increased into the 180s. Things moved very fast from there and after discussing and reminding everyone to save the placenta for us to take home- barring any issues or concerns, we were rushed into our c/s. Both of us were fine, but because I had a temperature, so did baby girl -101, so she was whisked off to be checked by NICU staff and hubby. We were both started on high doses of antibiotics as they assumed an infection due to the fever and heartrate but took cultures to check us both. I got my tubes tied and closed up while hubby went with baby girl.

I tell you all this because this complicated our placenta process a bit- possible infections could prevent you from ingesting or getting full benefit of your placenta. We had to check pathology, and wait to see if they would really release it. It was placed into sterile environment and biohazard bag and sealed up. We had to sign a release, and they told us it was fine for us to take. I called/emailed Jereka to let her know we delivered early and the situation. We both were not sure what we were dealing with. I didn't feel sick otherwise and we both set out to find out if this could move forward. I was still feeling confident about it. After talking with the Director of the Birthplace about possible concerns, and Jereka talking with other certified people about our roadblock, we both decided we felt safe moving forward. After all, if there was really a concern- the hospital would not have released the placenta to us.

My MIL brought it home in a cooler bag double wrapped in plastic bags. When I was released from the hospital days later, It was already in the dehydrator working. I met Jereka the next morning when she came in to finish up the pills. She told us that the placenta looked and smelled healthy as any other she has worked with before. We found if there was a problem I would get symptoms similar to food poisoning, so stop taking them if that happened- no issues btw. Below is a picture of all the items I got from Jereka along with paperwork and follow up emails and support about how to use them and prepare items.


Her card, a jar full of dehydrated placenta pills, my babies dehydrated cord shaped into a ring, and a tincture of a piece of placenta in vodka (my hubby picked up Everclear- he told the clerk he needed something that would pickle well -LOL)  Jereka said to use half the recommended amount because of this.

My pills. These I took were just like any other pill. Down with water- no problem or odd smell or taste that I noticed. They definitely work, and very quickly. I was much more at peace with 3 kids than I was with 2. My daughter is 2.5 months old now, and I did not have any PPD or down moments. When I stopped taking them daily and started to feel overwhelmed or emotional, I would take my pills. They worked immediately.
My skeptical hubby definitely noticed a difference in me this time around vs last time- he started bringing me my pills LOL. He even would show off my kit when people would come over.
I love the dehydrated cord- seeing the coloring the veins left. I find it sweet. I have seen some she did shaped into a heart- very sweet.

This was my tincture. It has to sit and steep basically for over 6 weeks. Then you filter it and put it in a new jar. Some can be put into a dropper bottle and store in a cool dark place. I have completed my tincture and it helps on my off days now.
Here is a close up shot of my pills. You can't see anything off- its just knowing what they are. I am very glad I did this. It was the best money I have spent. $150 was the special I grabbed up when she offered it one time. It was well worth my sanity this time around. I will definitely recommend it to anyone on the fence about this. I struggled with breastfeeding my other 2 because of my milk production. I have not had a problem this time. It is the first time I have been able to nurse exclusively. I have more energy and even after having 3 c/s surgeries- I have healed quicker and still been able to keep up with my other 2 children.

 I have lost weight quicker. I was 140, size 8 before I got pregnant and am already 130 and size 4 now. I can't say that will happen for everyone, but it is definitely a benefit/bonus. It may be because I have more energy to play with my other kids and all the nursing the baby is doing, but I was not able to do that before.


My hubby's opinion of this? 

If anyone else's wife has had PPD before you know how difficult that time is. Medicine doesn't always help and can add more issues. It's worth a try. Its your wife that will be the one taking it, why stop her from doing it. The process was very clean, it didn't bother me. I didn't see or smell anything gross. As far as did it work,  I would say Absolutely. She did not have the mood swings, wasn't near as *witchy, and has handled the switch from 2 to 3 better than I have and definitely better than from 1 to 2. 


If you have any other questions or comments, feel free to add them here or message me privately at begintocraft@gmail.com. This is a personal choice. Any comments made that are rude will be deleted. We prayed about this and thought about it for a long time. It is something that worked for me and I am extremely grateful for the job Jereka did. She was very professional and it was a smooth process. I am grateful for how quickly she checked into our questions and infection possibilities. This could have prevented me the option of using this but her research and follow up with it made it possible.  I am so glad to have had this option.

If you are in the Charlotte Metro area- be sure to check out Jereka at Wombmart
Pin It

Wednesday, April 25, 2012

{Giveaway} Rubbermaid Hidden Recycler


If you haven't already seen my review on this Hidden Recycler, you can check it out here.We are still enjoying our Recycler at my house. It is a great little chore to give my 5 year old, and teach her about recycling. 

Rubbermaid is generous enough to offer a Free Hidden Recycler to one of our readers. 


To enter :

  • Leave a comment on this post about where you would use it. 
Extra Entries:
  • Share this giveaway on facebook and comment here when you have done that
  • Share on Twitter
  • Like and leave a comment on my Facebook page
  • Follow me on Twitter @begintocraft
  • Like Rubbermaid's Facebook page 
  • Follow Rubbermaid on Twitter

Easy and several ways to enter. Be sure to leave a separate comment for each entry, and a way for us to contact you if you win.

The Giveaway will run through next Wednesday, May 2nd.


Pin It

Tuesday, April 24, 2012

{Front Porch changes}

The weather has been so nice that we can't help but spend our time outside. We knew when building our home that we wanted a large front porch- a true southern front porch. I love sitting in the rocking chair or swing and enjoying a cup of coffee or glass of wine at night. I love watching my kids play in the yard and even seeing the animals grazing. It is a nice way to live. We did want to do a few updates and it is always a work in progress. I don't have any before pictures, but here are some pictures I took as I was working on it. I have a few changes going on since then, but will update along the way.

I am not very good with plants, so would love some feedback on flowers and plants you would add around here- both on the porch and in the beds around it. Some plans I would like to see done in the next few years:

  • put in a walkway to the front door
  • install a gate to keep kids from falling down steps
  • maybe screen in at least part of the porch
  • add a small table for some meals and to complete a sitting area
what would you add? or change?


our house is beige siding, we have red stained wood flooring, so the pops of green fabric and plants help bring in other color. The barn birdhouse is a craft my daughter made in Bible School. The tree is a fake- heading to my in-laws soon.
A few annuals I bought for the hanging baskets.
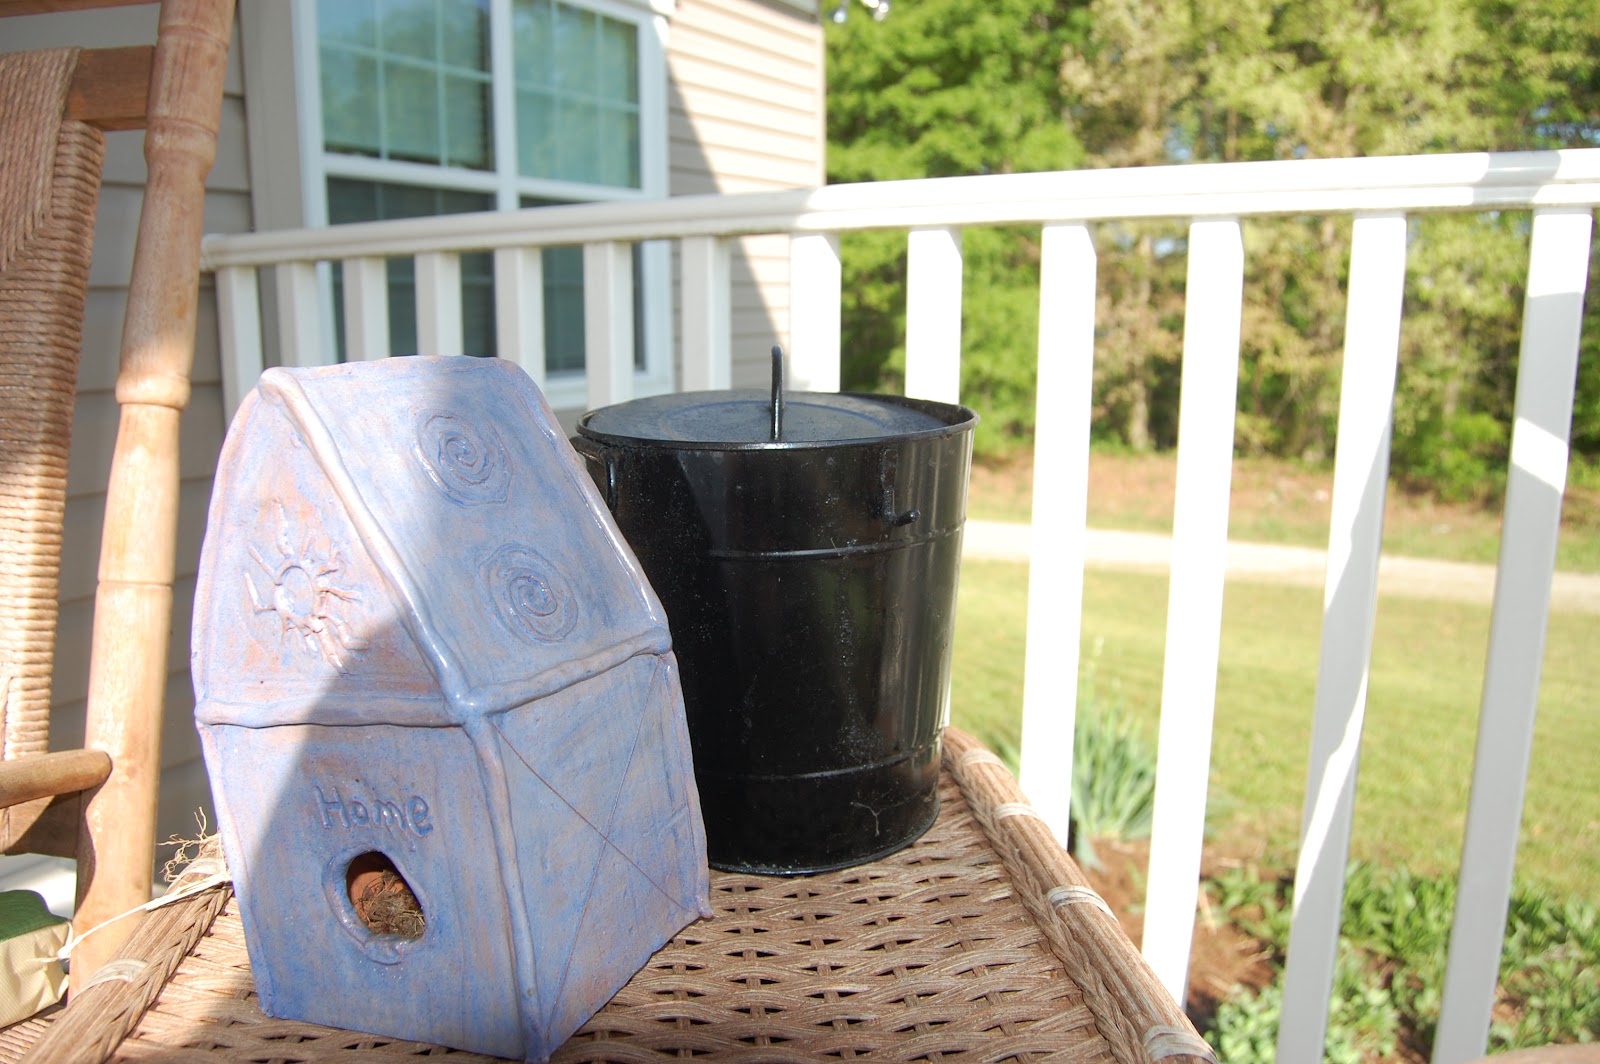
I made the birdhouse in college in one of my elective classes. It is the only thing decent that survived out of it lol. The black ice bucket used to be a match to that copper tray above. It was only a copper overlay and I could not keep it scrubbed clean- note to self: you don't like high-maintenance decor- copper or silver items are not good for you- too much work. So I spray painted it black- I know- GASP. but it works SO much better for us.
This little wicker table was something that MIL bought when she decorated a spare room of ours before we had the kids.So it got moved outside. Those colorful little tins hold tea lights. I grabbed them at World Market for the kids Easter basket.
The other side of the porch, and view of the animals. This view mostly shows you my mismatched cushions for the swing, and the hens and sheep grazing.


 These 2 little chairs came out of hubby's great- grandparents home. The cushions- cheapo's from Walmart. Plant stand has been here for years, the small table from my first home before we were married. Plants were clearance from Walmart- won't survive long this year but are bulbs and can be planted for future. Little green tub $4 from Walmart- used for trash out here.
This is a dry sink. It was my grandmothers. I even have a picture of it in her home before my dad was born. Note- try to upload picture to share on here. It will be undergoing a remodel soon- thinking of adding some light blue where the yellow is and then white all over, and then sanding it down to make it more shabby. What do you think? Oh and note that little  square planter on the bottom shelf- it will under go a change soon, my daughter is getting crafty and wants to spray paint something. ;-) Other flowers from Lowes and Walmart for hanging baskets, and the chair came in a set of 2 for $62 from Target couple years ago. I have not figured out a place for it yet.

Ok so I started with these cushions- really it is one cushion that was $16 from Walmart that I cut at the fold to make 2 cushions. I need to sew the back of them shut, but wanted to see how it looked first. Eh- its ok, not what I wanted. Probably can use it for filler for something else though. Found a better deal at Aldi's.

Either way, it is nice and comfortable enough to sit on and enjoy watching my kids play outside.  What do you think? Would love to hear tips and ideas you may have. What would you do different? Plants you love? I have more pictures coming soon of the flower beds around the porch. And yes, my daughter is still in her jammies playing outside.

Pin It

{New Coupons}

Monday, April 23, 2012

{Rubbermaid Handy Recycler}


I was contacted by Rubbermaid to see if I was interested in trying out and writing a review of their new space saving, hidden recycling bag. We were provided one for free for this review. We recycle here, but its probably different than a lot of people. We don't exactly compost either- we throw most of our scraps into our side yard for the chickens to eat. We reuse most of our other items to either use to start seeds in or water plants. We always try to make as much use of things as possible. There are some things that we just cannot find ways to reuse and they must then be recycled. 

Here is information that Rubbermaid provides about the use and benefits of this product, along with ad pictures:

We are very excited to introduce the Rubbermaid Hidden Recycler that gets recyclables off the counter and 
hidden out of sight. The features of the product include:
  • Easy attachment to a cabinet door with hooks included with the product or screws
  • A convenient handle allows the bag to easily be transported to wherever your recycling is stored for pickup or transport
  • A 5 gallon bag that holds up to 36 12-ounce cans and can fit a milk jug
  • The bag has a leak-proof liner and is machine washable to make it easy to clean after any unexpected spills
  • The bag is soft-sided allowing for flexibility inside any cabinet 
  • The bag and all packaging is made from recyclable material, and the product is recyclable 
                                                 
 
My daughter is especially interested in recycling thanks to her preschool, Earth day, and a recent episode of Curious George that she watched about recycling. She now will tell us based on the mark on containers that it can be recycled and she helps place things in this container.


We received it quickly and it was easy to put together. This is what it looks like hanging in place in our pantry above the trash can

 The bag was all one piece, we just had to fold and snap it onto the frame that has a handle and snap into place the hanging hooks.


 here I have folded it over the frame and secured it in place.


here are the hooks holding it


 and the handle is a good size with plenty of room

You can tell its a good size bag, and should be able to hold a lot. We break down boxes to lay flat, but some 2 liter or juice bottles take up a good bit of space.


 a few items in our hanging bin

 Now we don't live in a city, we are rural and do not have trash pick-up. We have to take off our trash to the dump. We usually only do this about every 2 weeks to save gas and time. This means we have a LOT of trash to take off with 3 kids and 2 weeks worth of trash lol. This bag does not hold enough recyclables to last that long, so we would then need to take it outside into a recycling can separate that will go to the dump separate. (We are still working on that) but it definitely is convenient and does not take up a lot of room. It is easy to manage- my 4 year old can haul it outside to put it in another container. If you have regular trash pick-up, this would be a breeze. This would also fit inside a cabinet door so it is VERY handy.


.
Here is another picture to remind you of its height and how much it can hold. The other thing I like about this bag is that it pops off the frame easily so you can wash it if it gets yucky smelling or food juice on it.


you just unhook it from here - there are 4 of them, and it slides right off the frame to be washed, and goes right back on just as easy. I was impressed with the quality of fabric it has- it is durable and strong. 


Also notice the lining on the inside- this prevents any leaks from going through and dripping onto your floor- this is part of the reason we hung ours over our trash can to test that theory ;-)

I think this would be a easy, affordable and convenient addition to a home that recycles!! The Hidden Recycler is currently available for purchase online at Rubbermaid.com and in store at Meijer.

Check it out! And if you are either very into organizing or trying to find ways to organize better, check out Rubbermaid's organizing website.


Rubbermaid contact info:
Facebook: http://www.facebook.com/RUBBERMAID
Twitter: @Rubbermaid


I was given a recycling bag free from Rubbermaid for this review. The opinions are my own.

Check out the post on Wednesday for a Giveaway of this product!!

Pin It

Deals:

(clicking links helps fund this blog)