Wednesday, February 29, 2012

{Yummy Tiramisu Recipe}


Pin It

Tiramisu is one of my favorite desserts. Surprising to my husband because I LOVE CHOCOLATE!


Jayna has a simple recipe posted that I can't wait to try.


Check out her post with the recipe and step by step pictures here at Behind the Studio.

IMG_1144


I will let you know how it turns out when I make it.

Tuesday, February 28, 2012

{DIY cupcake toppers}

I wanted to share with you how I put together the cupcake toppers I designed and made for my son's first birthday. I am sorry it has taken so long, since his birthday is in November and this post has mostly been written up in pieces since then. However, then the holidays rolled around, and then my focus has shifted to preparing for Baby Girl #2 arriving this month. So please forgive me.


I used the toppers both for the cupcakes and the cake for some decoration.


Here is a sample of the tractor topper I made and printed out. See the very short and basic step-by-step of how I made them here.


These are 1 inch circles, so to be simple I used a 1 inch circle punch to get them all punched quickly. Then I knew I wanted to layer them with some cardstock of some color. I did not have any bigger size circle punch. I was figuring 1 1/4 or 1 1/2 inch punch for the layered piece. I had looked and these are like 9.99 at least, and both Michaels and Hobby Lobby were out of this size. So I checked out a local downtown shop in Lincolnton, NC called Chic Custom Creations and I tell ya, I hit the jackpot.


I was able to use THEIR supplies/equipment- not paper for $5. I bought paper for 50 cent, and used their supplies to cut out my green and red 1 1/2 inch circles there and take them home to layer. This made my life to simple. I had planned to buy one and they did have it, but once I bought it and got home, no telling when I would have found time to do it. But I was kid free and sat down and got it done in less than 5 minutes. They were super helpful, offering suggestions and tips, helped me find what I needed. Koni- the owner, was not there. She was at a charity scrapbook event, but the staff that was there was very knowledgeable and kind, so I cannot imagine that Koni would be any different. They offer classes for various ages and levels through out the month.


So here is a picture of my green and red layer to see how it would look once I got home.


Then I just taped the 2 layers together and added toothpicks on the backs with tape and done!

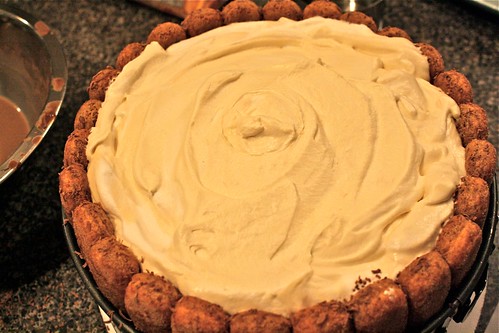
This made for super simple decor for the cake and cupcakes. I also laid some of the extra around the tables and surfaces.


And one final looks at how they turned out!

I don't know about you, but I was very excited about how they look!


Friday, February 24, 2012

{Freebie Friday}


Pin It


Make sure you take advantage of this week's Freebie from Share the Memories:
I love the embellishments that come with this set. The little jewel looking dots, hearts, and ric rac.


You will have one week to download this freebie.

You can download this weeks freebie by clicking here.


This Freebie contains the 2 Quick Pages shown and all the pieces (papers and elements) used to create those Quick Pages!
(The elements and QuickPages are.png and the papers are .jpg format.)


Remember, I will be sharing a new freebie every week.

If you have not purchased the software yet, you can do so here:


Use my code for a discount:

CODE: STMMMS72256
(I do get compensated if you use this)


They have a great social media presence and support group:


Tutorials on how to use the software and tips can be found here.


Monday, February 20, 2012

{Things to Love Roundup}


Pin It

Heather at Family Friendly Frugality shared this deal at Snapfish!
I LOVE ordering photo books! It’s so much neater than putting individual prints into an album and it makes a great gift! Snapfish has a *HOT* deal going on right now! 40% off Photo Books with the Snapfish promo code BOOKIT40!


~~~~~~~~~~~~~~~~~~~~~~~~~~~~~~~~~~~~~~~~~~~~~~~~~~~~~~~~~~~~~~~~~~~~~~~~~~~

Ginger Snap Crafts shares a DIY photo pendant tutorial


~~~~~~~~~~~~~~~~~~~~~~~~~~~~~~~~~~~~~~~~~~~~~~~~~~~~~~~~~~~~~~~~~~~~~~

This blog- Cute and cool Creations, shares an adorable Valentines scrapbook set. I would say this is a must have whether you scrapbook or not. I can see a TON of uses for the patterns!


~~~~~~~~~~~~~~~~~~~~~~~~~~~~~~~~~~~~~~~~~~~~~~~~~~~~~~~~~~~~~~~~~


Perfect Valentine Printable from My own Road's Blog


Also available in gray and teal.

~~~~~~~~~~~~~~~~~~~~~~~~~~~~~~~~~~~~~~~~~~~~~~~~~~~~~~~~~~~~~~~~~~~~


And Finally from Richella of Imparting Grace:


Hope you enjoy these Great February finds as much as I have.


Friday, February 17, 2012

{Freebie Friday}


Pin It


Make sure you take advantage of this week's Freebie from Share the Memories:

PLAID! I have always loved a little plaid. This also reminds me a bit of the Burberry pattern. Sweet little lovelies can be made with this pattern.


You will have one week to download this freebie.

You can download this weeks freebie by clicking here.


This Freebie contains the 2 Quick Pages shown and all the pieces (papers and elements) used to create those Quick Pages!
(The elements and QuickPages are.png and the papers are .jpg format.)


Remember, I will be sharing a new freebie every week.

If you have not purchased the software yet, you can do so here:


Use my code for a discount:

CODE: STMMMS72256
(I do get compensated if you use this)


They have a great social media presence and support group:


Tutorials on how to use the software and tips can be found here.


Thursday, February 16, 2012

{Friends Count}


Pin It
 
I think one thing we all know, learned early in fact, is how much we need friendship. That finding the right friend, fitting in, working through tough stuff with them is what makes life worthwhile.
 
I enjoy watching my daughter learn to make and keep friends. I sit back and let her talk through what she does and doesn't like about someone, and work it out. I would say my best friend is definitely a tie between my husband and my sister. They are the 2 people I call first for just about anything. My next BFF is not family- but she sure feels like it. We survived a sorta big fight, a lot of heartbreak, a move far away and back, and I am better for knowing her and her family. Her friendship through our various life changes, joys, and sorrows in spite of knowing what to say, how to act, and messing up, begging forgiveness has given me great hope. It has taught me to continue to be positive and encouraging to others that struggle with their friends. We never know what could have happened for someone to pull away from us. It could be us, could be them, could be something else entirely they just aren't able to talk about yet. But if the friendship really means something to you, you will continue to show the person that you are there for them, you care, and talk it out.
 
I have learned some friendships aren't meant to last. They are there for a season. We outgrow them, outgrow what they can teach us. I don't think this is a bad thing, it can be sad, but look back at the time together and smile and take what you learned from it and move forward. There is another friend out there that you need as much as you need them.


Well Build-A-Bear is celebrating!

~Celebrating a 15th Birthday
~Celebrating 100 million Best Friends made
~Celebrating Friendship


My daughter has a Build-a-Bear friend we made her on her first trip to the beach. She still has it and sleeps with it. I think it is a sweet thing to make a bear the way they do it, the stuffing, kissing and wishing on the heart you put in them, naming them. It is such a personal process.

I am not being compensated for this post. Just asked to share the information.

I hope you all have friends that you can count on, and if you have a little extra money and want to do something special- allowing your child to build a friend is definitely something to consider.


Wednesday, February 15, 2012

{Free Home Printable}


Pin It
 
 
 Jayna at Behind the Studio is offering this awesome Free Printable!
Go check it out yourself!


Be sure to check out her blog for fabulous ideas

Tuesday, February 14, 2012

{My DIY Valentines}


Pin It
I had seen this idea here last year and Knew I Had to do it!!!


This was so simple. The hardest part was getting my kids to cooperate. Really I expected to only get my 4 year old daughters done. I mean who was my 1 year old going to give valentine's to? I just got lucky with a picture of him.


He actually had food in his hand so it was balled up already lol. It is very hard even with my DSLR to capture a picture of him where he is not a blur. Especially because he likes to walk right up to the camera lens and wave in it, try to look through it, or touch it - HA!


And my sweet girl did several poses. Not sure why she likes to cock her head this way, but its the newest pose, so I went with it since it is the phase we are in.


All I did to edit these basic pictures was to open them up in picnik.com (which is closing in April) and added borders, text boxes, and the little stickers for Walker's. I only added the stickers to his because of the glare on the side of his face.

I then loaded these up to CVS and used a code to get them printed for free- 25 pictures total.

I plan to take a little exacto-knife and slice a small hole at the top and bottom of their fist and slide a sucker that we purchased into it. On the back of the picture, we will write the name of who it is to.


Monday, February 13, 2012

{Applique T-shirt Tutorial}


I saw this great photo on pinterest for a shirt I couldn't wait to make for my daughter and my niece.


So here is how I did it, and what I would do different next time:

So I gathered my supplies: shirt, fabric, heat-n-bond, ric-rac

I cut out myfabric circles and then the heat and bond slightly smaller and ironed them on to fuse.
Then placed them on the shirt where I thought they would look nice.
And fused them in place, as well.


Then it was time to see how much and where I would need the ric-rac.

after laying out my ric-rac and figuring out the lengths I would need and where to place them. I used fray check on the edges of the ric-rac that would be seen.

I sewed the ric-rac first so I could tuck it under the edges of the circles. Next time I would sew the ric rac first and then add the circles afterward wherever it seemed to fit best.


This was the setting I used on my zig-zag stitch. I needed it to do a fairly wide stitch but close together to look more like a satin stitch. You could do your stitch length further apart if you want to, would just give it a different look.


This is me SLOWLY making my way around the edges of the circle. You can see how it was necessary to do this if you can make out the fraying of the fabric at the edges.


Ok so let's be honest, zig-zagging around several circles is NOT easy. It wasn't gorgeous. It had some issues but it was necessary to keep the edges from fraying. One tip for next time would be to fuze the fabric to the heat-n-bond BEFORE cuttting out the circles. That would have prevented the fraying and possibly completely eliminated the need for the added time of zig-zagging the edges. I would also use fabric glue on the ric-rac next time. I think those two tips would have made this so much simpler.
 
Now one more picture of the finished project. My sister seemed excited about this one I made for my niece. I now need to finish my daughter's shirt.
 

Pin It

Friday, February 10, 2012

{Freebie Friday}


Pin It


Make sure you take advantage of this week's Freebie from Share the Memories:

Valentine's printable for you! Love the hearts and the red polka-dot background. I think this pattern is so sweet.


You will have one week to download this freebie.

You can download this weeks freebie by clicking here.


This Freebie contains the 2 Quick Pages shown and all the pieces (papers and elements) used to create those Quick Pages!
(The elements and QuickPages are.png and the papers are .jpg format.)


Remember, I will be sharing a new freebie every week.

If you have not purchased the software yet, you can do so here:


Use my code for a discount:

CODE: STMMMS72256
(I do get compensated if you use this)


They have a great social media presence and support group:


Tutorials on how to use the software and tips can be found here.


Deals:

(clicking links helps fund this blog)