Thursday, July 28, 2011

Little Man Tie Tutorial!!!

Love Love this! I bought a couple of these from a thrift store, They are so gosh darn cute. I have so much scrap fabric I can't wait to make a few of these for little man.


Little Man Tie Tutorial (shared from Very Homemade Blog)
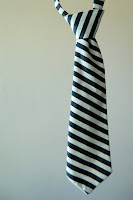
You Will have to go to her site for the tie patterns in the size. Plus tell her what an awesome tutorial she did!!


Okay, so here's a tutorial on how to make a fabulous tie for your little man. So if you have 30 minutes and some basic sewing skills, this project is for you. Oh, and please...if something doesn't make sense to you, let me know and I'll try and clarify! (OH, and Click on the photos to see the image bigger and a few additional notes I made.)


First, download the pattern. (If you try and print direct from adobe it will print just a corner of the pattern. Also, be sure that view on one page is selected.)

So if you are making a tie for a newborn, download patterns A and B for newborn.

If you are making a tie for size 2-5 T download patterns A, B for 2-5T, and C


Print them out and tape together. If you are making one for any sizes in between just add extra inches to the skinny end of the newborn tie. I know, I know.. I'm not being very precise.. but you have to remember I'm simply not an expert pattern maker. : ) You can also customize this pattern by making it an oh-so-chic skinny tie or an oh-so-fun wide tie if you want by simply narrowing or widening the pattern.

A


B Newborn


B for 2-5 T


C for 2-5 T


*** Always check to see that the 1 inch by 1 inch square is just that. If it doesn't you can always try enlarging/shrinking. Or you could just get the basic shape (from the photo below) and draw it out yourself.****


Then.. gather your supplies..

You will need


1/4 yard of studly-print fabric (prewashed). I used cotton. I'll call this the main fabric from here on.

1/4 yard of lining fabric (prewashed). I used cotton.

OPTIONAL: 1/4 yard of light weight Iron on interfacing (Some people said the interfacing made their tie too thick, I personally have had no problems with the Pellon brand light weight interfacing. But if you want to skip this part, by all means save yourself the time and money!)

3 1/2 - 4 inches of sewable velcro

pins

thread to match

scissors

large safety pin (this will make your life much easier!)

Iron, ironing board

and don't forget a sewing machine!


Ready. Let's go.

1. First, cut out your paper pattern pieces (A, B, and C)and tape together. Pin and cut or trace and cut the tie pattern from the interfacing.


2. Pin pattern onto your main fabric and cut across the grain. Do the same for your lining fabric. Optional: Iron on the interfacing onto your now cut main fabric (not the lining) according to product directions .


3. From your main fabric, cut a 2 1/2 inch by 17 inch rectangle for the neck band. (We'll use this later)


4. With right sides together, sew only the two v shaped corners at each end of the tie using 1/4 inch seam allowance. Clip corners.


5. Flip tie so that the right side of the fabric is facing out. Make sure the two end points are nice and pointy! Iron.


6. Fold your tie lengthwise with the lining fabric facing out. Line up all four layers of fabric. You can pin them together if you want. (I'm a bit lazy and skip that part!)


7. Sew along the length of the tie. You will probably need more than a 1/4 seam allowance here.. just make sure to get all four layers!


8. Iron the seam open.


9. Turn your tie right side out. Iron again. You're almost done sewing! Yeah!


10. Take the neck strap piece you cut earlier (2 1/2 inch by 17 inch rectangle) and fold in half length-wise (you know the drill, right sides together). Sew down the length of the fabric.


11. Turn the neck piece right side out. Here is where the safety pin comes in handy. Safety-pin one side of the fabric and then insert the safety pin through the fabric casing. Push the pin through to the other end pulling the fabric as you go. (Clear as mud, yeah?!?). Iron with the seam at the bottom (don't center the seam here.)


12. Now you will will simply tuck in the two ends of fabric into the casing of the neck piece. (I suggest folding a good 1/2- 1 inch into the casing.)


13. Pin the rough side of the velcro at one end of the neck piece. Flip the neck piece over and pin the soft side of the velcro at the opposite end of the neck piece (Make sure you have one piece of velcro pinned to the front and one pinned to the back.)


14. Sew along the velcro pieces as shown below.


That good old neck strap should look like this:


Horray! You're done sewing.. Now for the tricky part. Tying the tie.


Place the two pieces as shown below. The neck piece should be above the tie. The wide part of the tie should be to your right.


Wide part of the tie goes up and behind the neck piece like so...


Now bring it down and in front of the neck piece.


Tighten. Note where the knot will be. Now is when you should check the length of the tie and adjust accordingly.


Take the narrow part of the tie and bring it up and behind the neck piece.


Now bring it down and in front of the neck piece (Thank goodness for photos!)


Tighten. You will want to pull the tie down and the neck pieces out to tighten everything up. (This takes a little practice.. but you can do it!)


This is what the back of the knot should look like. I often (but some times I'm just lazy!) will tack the back together. Just hand sew a few stitches on the bottom of the knot to keep it in place.


Now find your own little stud and try it on!


Okay, so all I ask is if you use the pattern, let me know what I should change/clarify on this tutorial. And one additional favor, show me your handsome creations!

Wednesday, July 27, 2011

A few Back to school deals and codes

I get codes for product sales during the week and I know with so much to buy before school starts, the costs add up quick. Especially if you have more than one child to buy for. Here are a few codes that I hope help you out!


  • Kmart.com has all your Back to School & Campus Essentials + EXTRA $5 off $50 with BTSCHOOL thru 7/31
  • Yes to Style and Savings at Kohls. Save 15% off orders of $100 or more on Kohls.com: Code GAN15BTS!
  • Shop LittleMissMatched for all your back to school needs and enjoy free shipping. Offer good on 1st time purchase only. Expires on 8/31/2011
  • Mac Connection:  20% off all headphones with code Listen20. Limit 5 per customer.
  • Target.com: Shop Target's Back To College sale + Spend $50 get free shipping on select orders!

    Expires on 8/22/2011
  • The Children's Place: Free shipping on ALL denim. Expires on 8/1
  • Under Armour: Save up to 50% at the outlet + free shipping on $75 with code G9QH75 Expires on 7/31/2011
  • Textbooks.com has the biggest selection of textbooks at the best  prices. Free shipping over $25.
Hope you can enjoy the savings!!

    Tuesday, July 26, 2011

    New found obsession

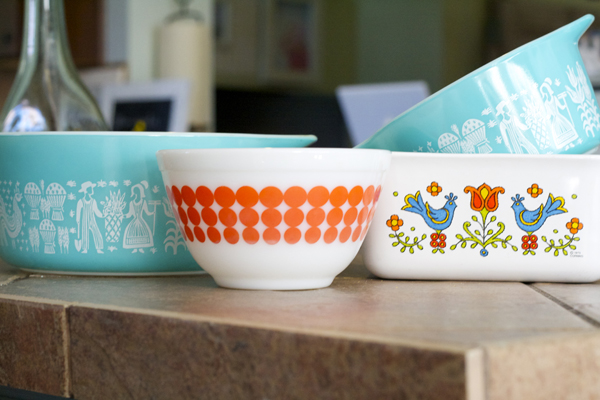
    Ok so I only have 1 little set, but who couldn't be obsessed with these adorable patterns, and the memories that come with so many of them.

    This pattern is the one I got, in 2 little dishes with lids.


    I want these sets desperately:
     
    We are trying to get away from plastic storage containers for food, and go back to the older options like glass that is known to be safer, better looking, and you can cook, and heat things up in them without worry of melting it. You can heat up these containers in your oven or on the stovetop, the microwave too.

    I also love the little bird pattern in this one.


    These patterns are SO cute:


    I remember my mom had sets like these:


    How could you not fall in love with these?

    The nesting bowls, some of which have lids if you are lucky enough to find them. I got lucky and my grandmother still had her full set.


    What's your newest obsession? Do you have some old pyrex dishes? What patterns bring you the most memories? I remember the white ones with little blue flowers on it.

    My favorite cup


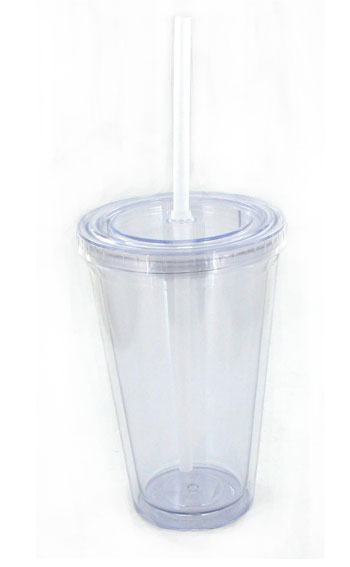
    So I have had a few of these style cups now since November. I got my first one at Hobby Lobby for $3 and it was plain and clear. Then I couldn't find anymore plain ones for decent price. I knew it would be a perfect way for me to keep hydrated while nursing with the baby. I like that it has a lid and a straw that won't just fall out and if tipped over won't spill out. Not sure exactly why that is, as I am not a physicist since there is still a little area that the liquid could seep out of between the straw and its opening. But since I knew I already LOVED it, I didn't expect that my husband would love it as much as he does. He already was swiping it for himself and using it. So while we were at the beach I found a cheap one that said Myrtle Beach so we could both have one. Well, that didn't happen either. Hubby has one on his tractor and one he takes to work and I still have NONE. LOL

    This was apparently a Big hit, its not often hubby gets attached to a cup. My 4yo daughter loves it too and I don't have to contain her to just the kitchen to drink when she uses it. There are no spills, even safe for the car.


    We got lucky out shopping Sunday and while wandering into World Market, they had a sale on these cups. Plain, no design, and several colors. We got red, blue, clear, and orange. They also had green. They were BOGO Free!!! which made them $3 each. AND I didn't even know you could buy extra straws but you can, and we grabbed a bag of 6 for $3.50. We definitely needed one since we lost one to a tractor accident lol. These are great for us as a family and now we all have one to use. We will probably continue to buy a few of these to keep on hand. I fill mine up before heading out to work and keep refilling it through out the day. The many color options makes it easy to know who's cup it is too!
    They are acrylic so do not break. And you can use vinyl cut outs from your Cricut or Silhouette to personalize and decorate your own!


    Ok sorry, just had to add- if you are a Glee follower, anyone else remember the National original song Britney did about her cup? lol

    Published with Blogger-droid v1.6.8

    Friday, July 15, 2011


    Our Summer So far:
    ~pictures at Rock Springs Campground
     ~We went to the beach
    ~some great cousin time at the beach
    ~my mermaid enjoyed posing in her dance costume lol
    ~ some great photo ops at the beach. I just love the trees and those pinecones.
    ~some simple projects around the house
    ~more pics of my kids
    I can't wait to have some time to play with PS to see what I can do with some of these pictures. I see the tree and pinecone ones being framed in either one of those old pane windows I found, or in a black or white frame in my living room.


    My fireplace before ^

    Fireplace After, well except for my blue peacock which currently is beside the scale to balance out the birds. I Love it so much better.
    My Kids! aren't they just precious!


    Thanks for letting me share some gratuitous pictures. Enjoy your summer!

    Things I love!

    I haven't been feeling so well lately and so am slightly unmotivated to finish a few projects I have been working on or starting anything new. Besides I really need to clean the house and get ready for company coming in for baby boy's Baptism and cookout this weekend. So I can't leave you guys without at least sharing some neat ideas I have found on blog world that I can't wait to try. What are things that you have found and can't wait to try or share?


    I Love this romper from a t-shirt shared on Sugar Bee Crafts

    Friday, July 8, 2011

    New printable Coupons

    Coupons.com has some great new coupons this week! I've included several of them below.


    Food & Beverage:


    $5.00 OFF any Large Powder 22 oz. or above purchase of Gentlease, A.R. or ProSobee

    $5.00 OFF 1 Enfagrow Powder

    $2.00 OFF any 3 pkgs of Kellogg's Pop-Tarts toaster pastries and/or Kellogg's Pop-Tarts mini-crisps

    $1.50 OFF ONE (1) 11 oz package of Starbucks Natural Fusions

    $1.50 OFF ONE (1) multipack of BOOST Kid Essentials Nutritionally Complete Drink

    $1.00 OFF ANY (ONE) 1 GERBER GRADUATES LIL' ENTREES SELECTIONS

    $1.00 OFF TWO (2) GERBER GRADUATES PUFFS OR LIL' CRUNCHIES SNACKS

    $1.00 OFF FOUR any flavor/variety LÄRABAR or JOCALAT bars

    $1.00 OFF 1 Smart Chicken product

    $1.00 OFF 1 McCann's Irish Oatmeal product

    $0.75 OFF any flavor/variety Cascadian Farm product

    $0.75 OFF ONE BOX Fiber One 80 Calories cereal

    $0.75 OFF ONE BOX Cocoa Puffs Brownie Crunch cereal

    $0.75 OFF ONE BOX Cookie Crisp cereal

    $0.75 OFF TWO any Nature Valley Granola Bars

    $0.75 OFF TWO any flavor Yoplait products listed: - Yoplait Go-GURT Yogurt - Yoplait Kids

    $0.75 OFF THREE BOXES any flavor/variety Betty Crocker Fruit Shapes, Fruit by the Foot, Fruit Roll-ups

    $0.75 OFF 1 Newman's Own Salad Dressing

    $0.75 OFF 1 package of Truvia natural sweetener

    $0.55 OFF on any Bagel-fuls (4ct)

    $0.50 OFF ONE 28 oz. OR larger Bisquick Baking Mix OR Complete Pancake & Waffle Mix

    $0.50 OFF TWO any flavor/variety Pillsbury Toaster Strudel OR Toaster Scrambles Pastries

    $0.50 OFF ONE BOX any flavor/variety Nature Valley Granola Thins

    $0.50 OFF ONE BOX Honey Nut Cheerios cereal

    $0.50 OFF 1 Dietz & Watson franks & sausages

    $0.40 OFF SIX CUPS any variety Yoplait Yogurt

    $0.40 OFF ONE BOX any flavor Fiber One 90 Calorie Chewy Bars OR Fiber One 90 Calorie Brownies

    $0.40 OFF TWO PACKAGES any flavor/variety Totino's Rolls Snacks


    Personal Care:


    $5.00 off Any ROGAINE product

    $2.00 OFF 1 renu fresh or renu sensitive multi-purpose solution (8 oz or larger)

    $2.00 off any Sally Hansen Nail Treatment Product

    $1.00 OFF any 1 Coppertone Suncare Product (excluding lip balm or trial size)

    $1.00 OFF any one (1) NIVEA Good-bye Cellulite Product (2.5oz.-6.7oz.)

    $1.00 OFF any L'Oréal Paris Go 360° Clean Product

    $1.00 OFF any L'Oréal Studio Line Styling Product

    $1.00 OFF any ONE (1) GARNIER FRUCTIS SHAMPOO or CONDITIONER (excluding trial sizes)

    $1.00 OFF ONE (1) GARNIER FRUCTIS STYLE PRODUCT

    $1.00 OFF any ONE (1) package of POISE Pads

    $1.00 OFF any ONE (1) package of POISE Liners

    $1.00 OFF any 1 Dr. Scholl's Odor-X Product

    $1.00 OFF any 10 oz. or larger size of Biotrue multi-purpose solution

    $1.00 OFF 1 N.Y.C. Eye Color

    $1.00 OFF 1 NIVEA Express Hydration Lotion or Gel

    $1.00 OFF 1 Box of 14 count Instead Softcups

    $0.75 OFF 1 Efferdent PM Denture Cleanser


    Pet Care:


    $1.00 OFF 8 cans of ALPO Dog Food

    Sign up for NUTRO Pet Rewards!


    Health Care:


    $2.00 OFF 1 SLOW-MAG Tablets

    $2.00 OFF any 1 NASALCROM allergy product

    $1.00 OFF any BENADRYL Anti-itch product (excludes trial sizes)

    $1.00 OFF any Dr. Scholl's Freeze Away

    $1.00 OFF any any Dr. Scholl's Clear Away Products

    $1.00 OFF 1 NEO-SYNEPHRINE PRODUCT


    Household:


    $3.00 OFF Lysol Clean-Flip Starter Kit

    $2.00 OFF AmeriGas Cylinder Exchange or Purchase

    $1.50 OFF ONE (1) 12 pack or larger of SCOTT Naturals Tube Free Bath Tissue

    $1.00 OFF any ONE 32oz or Larger Bottle of GREASED LIGHTNING Multi-purpose Cleaner

    $0.55 OFF any Chore Boy Product


    Home Entertainment:


    $3.00 OFF Walk the Line on Blu-ray

    $3.00 OFF All That Jazz Music Edition on DVD

    $3.00 OFF Crazy Heart on Blu-ray

    $3.00 OFF The Sound of Music on Blu-ray

    $3.00 OFF Moulin Rouge on Blu-ray

    $3.00 OFF History of the World Part 1 on Blu-ray

    $3.00 OFF The Rocky Horror Picture Show on Blu-ray

    $3.00 OFF Oklahoma! 50th Anniversary Edition on DVD

    $3.00 OFF South Pacific on Blu-ray

    $3.00 OFF The King and I 50th Anniversary Edition on DVD

    $2.00 OFF Nurse Jackie DVD or Blu-ray


    Entertainment:


    Save $30 at Chuck E. Cheese

    $7.00 OFF Regular Admission at Cedar Point Amusement Park


    Books & Magazines:


    $2.00 OFF July issue of ESSENCE


    Click here to print now: Coupons.com

    Thursday, July 7, 2011

    New Food Pyramid: USDA's MyPlate

    Have you seen it yet? I am just now seeing it. I want to get my sister's view on it, since she did a lot of work on her dissertation on obesity and healthy eating. She has taught our family a lot about eating properly. We go meatless a couple days a week, using beans instead. We roast most of our veggies instead of using fat and other sugars to add flavor. But it is nice to see the government changing their view of things.


    Here is her take on it: we use it in our sessions work in childhood obesity research and have found that families really like the plate method. We were excited that the pyramid image was replaced by the plate. It makes sense because people can visualize how much of each food group goes on the plate. The "analyze my diet" function is awesome as well as the plan my menu. They even have recs for nursing mothers.

    USDA's MyPlate - Home page

    The website has come a long way. There is even a coloring page for kids to learn the portion amounts. There are foodtrackers available as well as some great food plans for different age groups!

    Small event planning

    I am planning an event for family and friends with my son's upcoming Baptism and Hubby's birthday in a few weeks! Sometimes you hear about 2nd children being treated differently than first, and though it is tough to juggle two and pay them equal attention, I want to do something special for my baby boy! So a small cookout after the ceremony at our home is simple and inexpensive while still being celebratory. It is hot, so though we have plans to put up either a gazebo or screen porch one day, that will not happen by then. We do have a 10x10 white tent we will use, probably on the back deck for some easy shade. We have a sprinkler and kiddie pool for the kids to cool off in while playing by the playground.

    Now the food will be fairly simple. Hot dogs and hamburgers, baked beans, cole slaw, pasta salad, and desserts. I am fortunate enough that all the family wants to help, so Hubby and I will provide the meats, condiments and drinks, while family will be making the side dishes listed above and some sweets.


    I have to make some type of dessert though, I can't help it. I have a sweet tooth, and Love desserts. So really you can't have too much dessert! I have to share the following recipe with you.


    I love a few things from Richella's site.

    This cake recipe which she calls the cake that will make you famous, and who can argue, it is a big hit on the blogosphere.


    Here are the ingredients you'll need:


    You'll also need eggs, oil, and water. Mix up the white cake according to package directions. You can use any cake mix that makes you happy (or, if you're like me, you'll use the one that was on sale).


    Prepare two round cake pans; divide batter evenly between the pans. HINT: If you have a food scale, use it to make sure your batter is divided evenly. Otherwise, just eyeball it.


    Bake layers according to package directions. Allow the two cake rounds to cool thoroughly.


    Meanwhile, make your filling/frosting by combining


    1 lb. powdered sugar, sifted
    8 oz. sour cream
    2 6 oz. packages frozen coconut (find it in the frozen fruit section of your grocery store), thawed


    Mix thoroughly.


    When cake layers are completely cooled, cut them in half horizontally. You'll be creating four layers. I use a long serrated knife for this process. Don't worry if the layers aren't perfect.


    Place one layer, cut side up, on a cake plate. It's best to use a plate with a lip, since your filling/frosting will be fairly runny.


    Spread 1/4 of your filling/icing on the first layer. HINT: Again, if you have a food scale, use it to make sure you're using 1/4 of your filling for each layer. You'll have 36 oz. of frosting, so use about 9 oz. per layer. If you don't have a food scale, just eyeball it. . . but if you do have a food scale, it's useful for making this cake just right!


    Continue stacking each layer, cut side up, on top of one another, topping each layer with 1/4 of the filling.


    When you've stacked the last layer and spread the last bit of filling on top, you may want to sprinkle a bit of flaked coconut (I like Baker's Angel Flake) on top just because it looks pretty.


    Now here's the most important part. Cover the cake well (I cover it with plastic wrap first, then also with foil) and refrigerate it for at least TWO DAYS before serving. Three days would be fine, too. But it needs to sit for at least two days to give plenty of time for the yummy filling to sink down into every crevice of the layers--the layers that you placed CUT SIDE UP, remember? After two days the cake will be moist and cold and absolutely irresistible.

    I also love her idea here of using a beverage dispenser. It is July after all and it will be HOT, and even though we have a large home, we know we need overflow space outside. And will need lots of cool drinks to keep everyone hydrated. I think this looks So sophisticated, and even something as simple as water with some fruit added for flavor looks So much nicer!

    Tuesday, July 5, 2011

    A few of my favorite things......

    Raindrops on roses, and whiskers on kittens......sorry I just couldn't help it. I enjoyed a wonderful 4th Holiday weekend, complete with Zac Brown Concert with my hubby and a few surprises. I ran across several great ideas on blog land that I couldn't wait to share with you! I plan to try my hand at a few of these, but some may be a while or I just love and couldn't wait to share with you. If you were featured, be sure to grab my Featured button on my sidebar!


    book birdhouses
    How adorable are these! She has step by step tutorial with pics on her site on how to make these. I am in LOVE! So stinkin cute! I must try this!


    This Easy knit skirt tutorial


    She does my kind of sewing, not really measured, not really following directions....


    Then.... there is this great Printable for summer. I can see my daughter being occupied with this for a while during road trips and outside. though there are a few that would be hard to find in our neck of the woods....


    I love recycling and finding new uses for things, especially if it is something I have in Large quantity of like say, Diaper boxes.

    do you see the Huggies logo showing through? She has a great step by step tute on how to do this!! Great idea huh.....


    If you were featured don't forget to grab the featured button! Happy Tuesday!! woohoo for short work weeks!

    Friday, July 1, 2011

    Peacocks.....

    I Love Peacocks. I like the feathers people use to decorate with. I want to get one for our farm. I Just Love Love Love them. I lucked up to find one at a yard sale a few weeks ago for $1.

    Isn't he handsome? but the colors are not what you think of when you think of royal blues, teals and purples of peacock feathers, Plus it doesn't go with ANY decor in my house. I wanted another bird for my mantle to balance the hen I painted, so I thought this would work perfect. Its about the same size. I grabbed the spray paint can I used to spray my frame and chicken that I used here.

    Didn't he turn out so cute? Now you know why I am calling him a He, right? the hens-females, do not have the pretty decorative plumage that the males have. They are pretty plain and brown. It is the males that have the beautiful plumage to attract the females, and in case you didn't notice, that is why it is called the peacock...not the peahen.

     I am In LOVE with how sweet it is. The blue is so much prettier and even covers up the little chip it had in one of the tail feathers.
    

    what do you think? not bad for $1, now I need to remember to post a picture of him sitting up on my mantle.

    Deals:

    (clicking links helps fund this blog)