Monday, April 23, 2012

{Rubbermaid Handy Recycler}


I was contacted by Rubbermaid to see if I was interested in trying out and writing a review of their new space saving, hidden recycling bag. We were provided one for free for this review. We recycle here, but its probably different than a lot of people. We don't exactly compost either- we throw most of our scraps into our side yard for the chickens to eat. We reuse most of our other items to either use to start seeds in or water plants. We always try to make as much use of things as possible. There are some things that we just cannot find ways to reuse and they must then be recycled. 

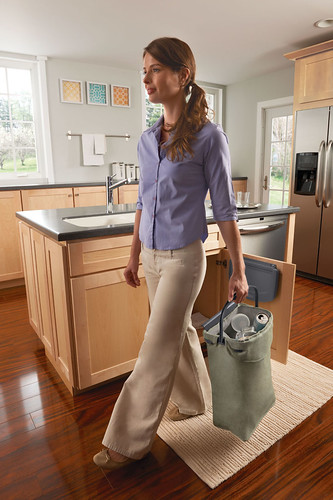
Here is information that Rubbermaid provides about the use and benefits of this product, along with ad pictures:

We are very excited to introduce the Rubbermaid Hidden Recycler that gets recyclables off the counter and 
hidden out of sight. The features of the product include:
  • Easy attachment to a cabinet door with hooks included with the product or screws
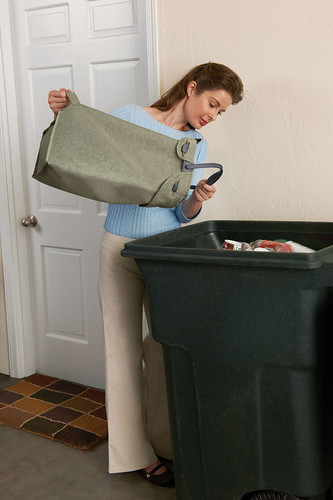
  • A convenient handle allows the bag to easily be transported to wherever your recycling is stored for pickup or transport
  • A 5 gallon bag that holds up to 36 12-ounce cans and can fit a milk jug
  • The bag has a leak-proof liner and is machine washable to make it easy to clean after any unexpected spills
  • The bag is soft-sided allowing for flexibility inside any cabinet 
  • The bag and all packaging is made from recyclable material, and the product is recyclable 
                                                 
 
My daughter is especially interested in recycling thanks to her preschool, Earth day, and a recent episode of Curious George that she watched about recycling. She now will tell us based on the mark on containers that it can be recycled and she helps place things in this container.


We received it quickly and it was easy to put together. This is what it looks like hanging in place in our pantry above the trash can

 The bag was all one piece, we just had to fold and snap it onto the frame that has a handle and snap into place the hanging hooks.


 here I have folded it over the frame and secured it in place.


here are the hooks holding it


 and the handle is a good size with plenty of room

You can tell its a good size bag, and should be able to hold a lot. We break down boxes to lay flat, but some 2 liter or juice bottles take up a good bit of space.


 a few items in our hanging bin

 Now we don't live in a city, we are rural and do not have trash pick-up. We have to take off our trash to the dump. We usually only do this about every 2 weeks to save gas and time. This means we have a LOT of trash to take off with 3 kids and 2 weeks worth of trash lol. This bag does not hold enough recyclables to last that long, so we would then need to take it outside into a recycling can separate that will go to the dump separate. (We are still working on that) but it definitely is convenient and does not take up a lot of room. It is easy to manage- my 4 year old can haul it outside to put it in another container. If you have regular trash pick-up, this would be a breeze. This would also fit inside a cabinet door so it is VERY handy.


.
Here is another picture to remind you of its height and how much it can hold. The other thing I like about this bag is that it pops off the frame easily so you can wash it if it gets yucky smelling or food juice on it.


you just unhook it from here - there are 4 of them, and it slides right off the frame to be washed, and goes right back on just as easy. I was impressed with the quality of fabric it has- it is durable and strong. 


Also notice the lining on the inside- this prevents any leaks from going through and dripping onto your floor- this is part of the reason we hung ours over our trash can to test that theory ;-)

I think this would be a easy, affordable and convenient addition to a home that recycles!! The Hidden Recycler is currently available for purchase online at Rubbermaid.com and in store at Meijer.

Check it out! And if you are either very into organizing or trying to find ways to organize better, check out Rubbermaid's organizing website.


Rubbermaid contact info:
Facebook: http://www.facebook.com/RUBBERMAID
Twitter: @Rubbermaid


I was given a recycling bag free from Rubbermaid for this review. The opinions are my own.

Check out the post on Wednesday for a Giveaway of this product!!

Pin It

Saturday, April 21, 2012

{Create Your Own Blog Header}

Great Tutorial was shared on My Memories to create your own custom header. They also have a tutorial to create your cover page in Facebook that I will be sharing soon as well.

How to use My Memories Suite to create a Blog Header

Did you know you could use My Memories Suite to create a custom blog header?

Have you ever wanted to create a header for your own blog but couldn't find the perfect template?

Now you can have the perfect blog header that looks just the way you want using MyMemories Suite Software.

Steps to Create your own Blog Header:

  • To choose your own custom size, just create a new album and choose design your own.
  • Then choose the ›Custom Size tab in the middle of the screen.
  • You can set the size by inches or pixels.
    • Usually a blogger header is around 1000x300 pixels and a WordPress header is 904x160 pixels
  • Add whatever content you want, including papers, pictures, text and embellishments.
  • Finally, click on Share Album in far right column and select Export
    • In the Export Wizard, make sure that the image type is jpeg and the image size is the size you chose for your header and click finish
  • Then all you have to do is load it into your blogger, see bottom of pdf tutorial below for more information on this step!


Have fun and enjoy creating your own custom headers!
And don’t forget to share with your readers when you are done!
 

Need more help?
 
Here is a great tutorial in version 2 that shows you just how to do it.
 
Video Link: http://www.vimeo.com/21509560
 
PDF link: http://www.freewebs.com/lisaj/March Into MMS - Day TWENTYFOUR-FIVE.pdf


Pin It

Friday, April 20, 2012

{ Freebie Friday x2 }


My Memories is offering a Special deal right now.


MyMemories was FEATURED
on the Mother's Day Special for
LIfetime Television's Morning show, *The Balancing Act*!! 


Check out our  FREE Photobook promotion 
to celebrate our Balancing Act feature!
And watch MyMemories on *The Balancing Act* !!

click here to watch


We are excited to be able to extend to you and your readers a *FREE Photobook in conjunction with our appearance on *The Balancing Act*


TIP:  Photobooks are great to use as theme books.  You can create one recapping the pictures from a specific year or time period, a special family vacation, a family recipe book, or even about a special person.

You have 20 pages to tell a story through pictures, what can you dream up?


This week's freebie is another gift bag. Remember you can change these up by adjusting in the software. 


You have one week to download this freebie. Click here to get it now


Remember, I will be sharing a new freebie every week.

If you have not purchased the software yet, you can do so here:


Use my code for a discount:

CODE: STMMMS72256
(I do get compensated if you use this)


They have a great social media presence and support group:


Tutorials on how to use the software and tips can be found here.


Pin It

Tuesday, April 17, 2012

{New Coupons} & Harris Teeter Super Doubles


Monday, April 16, 2012

{Freebie Friday} except on Monday


The freebies are getting cooler. Now  you can make your own craft items too. And they make it easy for you!!


TIP:  Make your own printable craft items and save them .jpg format for using again and again!  These little gift bags make great packaging for gifts, and you can personalize them using MyMemories Suite Software!!

By enclosing all of the papers and elements that went into making these printable gift bags, you are free to use them to create your own projects and show how you did it!! The printable creations that can be made from these pieces are limitless!!

Please note that these papers and elements are usable in any graphics software.


TIP:  Make your own printable craft items and save them .jpg format for using again and again!  These little gift bags make great packaging for gifts, and you can personalize them using MyMemories Suite Software!!

By enclosing all of the papers and elements that went into making these printable gift bags, you are free to use them to create your own projects and show how you did it!! The printable creations that can be made from these pieces are limitless!!

Please note that these papers and elements are usable in any graphics software, and we wish to allow you to interest all persons who visit your site to consider picking up MyMemories Suite using your Share the Memories code, but these freebies are for everyone!!


Here is this weeks download


You have one week to download this freebie. Click here to get it now


Remember, I will be sharing a new freebie every week.

If you have not purchased the software yet, you can do so here:


Use my code for a discount:

CODE: STMMMS72256
(I do get compensated if you use this)


They have a great social media presence and support group:


Tutorials on how to use the software and tips can be found here.


Pin It

{Coupons}

Thursday, April 5, 2012

{Guest Post} A Little Standout tray for my coffee table


 A little standout tray for my coffee table

Guest post written by Cindy Hallman

When you have such a tiny living room like we do, you like to give the opinion that you can fit a whole lot more stuff in it than you actually can. I try really hard to do that and when we host dinner parties and things like that we have to get creative with our seating and things like that. I'm looking for some furniture that will be a little more versatile and doing a lot of comparison shopping for it.

I'm taking my time with my online shopping because this isn't a shirt, this is furniture! So I want to make sure that it's perfect for us. When I was looking through some contracting services, I saw stuff about roofing replacement and we've been putting that off for a while, so I'm going to use them to get our new roof done. Believe me, our home really needs it.
I found this wonderful little red lacquer tray that I think I'm going to use along with an ottoman that I found. The two of them can function as a side table when it's just us and we can use the ottoman for seating when guests are there. I love how attention getting the tray is!


Pin It

Wednesday, April 4, 2012

{Free labels}


This is a great deal rolling around again. I use these to make labels with my kids name on them for coats, shoes, sippy cups, bags and more. Much cheaper than other labels you can buy, and more choices.

Only pay shipping.


Pin It

{New Coupons} some Easter

Tuesday, April 3, 2012

{Guest Post} Scrapbooking


Creating A Hybrid Scrapbook Album

I am happy to post this awesome tutorial using one of my favorite digital software packages- My Memories Suite. This is a great way to put together the scrapbook online but use your craft and scrapbook supplies to make something more tangible. I love getting my craft on and am a bit of a sucker for scrapbooking supplies. I have been making scrapbooks since I was in middle school. (man are those entertaining to look back at now, supplies have come a long way). So check out this great tutorial.

If you have not purchased the software yet, you can do so here:


Use my code for a discount:

CODE: STMMMS72256
(I do get compensated if you use this)


By Barbara Eastwick
Level: Beginner to intermediate

Creating a hybrid scrapbook sounds much more 'technical' than it really is. "Hybrid" just mean that your project will incorporate some element of digital graphics and some element of tangible material. For this project we are using 5.5" x 5.5" Quick Pages that have been completed and printed out, scrapbooking paper, a 6" x 6" Accordian Style Create and Treasure blank book, gold paint and glue. The Quick Pages used in this project were created from the November RAKScraps Mega Kit. The completed quick pages were printed by my local store printer. The blank board book can be purchased at most craft stores, and they have so many sizes and shapes to choose from.  And, of course, the digital layouts can be easily made using MyMemories Suite Software!!

Here are the supplies I used:
These Blank Board Books are beautifully done and do not require any preparation before use. My layouts however, have a definite Fall theme, and as such I wanted to paint my blank board edges a deep antique gold. Note that I did not need to paint the entire board book, just the edges and a little bit of the pages, but most specifically, the inside and outside creases.
This album has 10 pages. I chose three scrapbook papers and I cut them down to 6" x 6" squares. I most certainly could have left my papers with a squared edge and just layered my printed Layouts on top of them, but I like the look that corner slot punches, and corner rounders give. I use the corner slot punch first on all four corners, and then used the corner rounder on each one.
From here I simply inserted my finished printed layouts into the corner slots. And this is the time where you would wish to take to a moment and see if you wish to add any other tangible embellishments. I'm adding paper flower embellishments with brad middles, tabs, cardstock stickers, labels, and more. Once you have your finished pages how you'd like them to be, simply adhere them to each page of the album. You want to use a very strong adhesive, preferably acid-free, to ensure the longevity of your project. If you use a liquid glue please be sure to watch for overruns and spills as you brayer the layer on to get the air bubbles out. If you use a two sided tape adhesive, you'll want to be sure to run your adhesive to the edges, so they don't peel off or fray over time. You certainly may sand and ink your edges, too, if you desire.
Here's my finished album. It can be folded and tied with a ribbon to present as a gift, or it can be opened and left on a mantle or shelf to be displayed!
Of course, using these few techniques - the options are limitless! You can create any size album, or any shape album!
Here's my next one! It's an 8" x 8" Board Book with my family's Christmas Layouts. These pages were created using the December RAKScraps Mega Kit, and had it printed.  It's far less expensive and much better quality than printing them out myself! I'll be making two of these and sending them off to the Grandmas!


If you have not purchased the software yet, you can do so here:


Use my code for a discount:

CODE: STMMMS72256
(I do get compensated if you use this)


Pin It

{Free Subscription to Ladies Home Journal}


Pin It

I am grabbing a copy of this myself. 

Get Your Free Digital Subscription to Ladies Home Journal.
this is an affiliate link

Monday, April 2, 2012

{Guest Post} Lisa at The Party Works


Birthday Party Craft Ideas

We like to get crafty in our household.  I grew up that way and now my two kids are following in the DIY tradition.  Since birthday party crafting isn’t really all that common these days, we’ve tried setting up crafting activities for the kids at a couple of birthday and slumber parties over the years and they’ve all been a huge success.  The kids are super into it and stay really focused on their projects, which is absolutely darling to watch.  Here are a few of the craft projects we’ve tried with the girls and their friends:

1.     T-shirt or apron painting party.  This one is especially good for birthday parties because the kids can take home their projects as mementos of the special occasion and as their party favors.  You can either give them totally blank t-shirts or ones with simple iron-on transfers that they can then paint uniquely.  The apron painting is fun too, and the kids can also sew on felt or patterned cutouts. 
2.     My oldest is a spring baby, so one year we did a planter decorating party and I showed the kids how to plant a small ivy shoot in their pots when they dried and they took them home.  This one is especially inexpensive.  Small, plain terra-cotta pots run about $1 and you can take ivy clipping from one plant and get a bag of potting soil.  We already had a ton of paints and brushes, but even a new set won’t run you much and the whole project for 10 kids will be under $50.
3.     For the younger kids that aren’t quite ready to get into painting clothes and planters, we did Popsicle picture frames.  We took a photo of each kid at the party and printed them out on our photo printer, then glued them into a Popsicle frame that they decorated with paints and glitter to take home.  We fashioned magnets on the back of each frame so they were ready to grace their refrigerators at home. 

Well, there you have it!  A few ideas to get you started on crafting party ideas.  Hopefully exposing your kids to these kinds of fun activities will instill in them a lifetime of crafting.  

Lisa is a guest writer who focuses on the topics of kids’ birthday party activities like crafting and scavenger hunts and where to find Mario party supplies online for themed parties. 

Pin It

{New Coupons}


NEW COUPONS AVAILABLE!
Yes  it is the first if the month


$0.50 off 1 Suave Professionals Keratin Infusion 

$1.00 off when you buy any AXE Product 

$1.00 off COLGATE ORABASE 

$1.00 off one Resource ThickenUp Clear 

$1.50 off ten (10) cans of ALPO Dog Food 

$1.25 off 1 bag of Milo's Kitchen dog treats 

$0.50 off One Package of LAND O LAKES Fresh Buttery Taste Spread with Olive Oil 

$1.00 off 2 General Mills Kid cereals 

$0.75 off Multi Grain Cheerios 

$1.00 off 4 LARABAR or JOCALAT bars 

$0.75 off any Cascadian Farm product 

$1.00 off two Pure Protein Bars 

$0.40 off one Treasure Cave cheese product 

$0.40 off one Frigo Italian Style Cheeses 

$0.40 off one Dragone cheese product 

$0.40 off one Stella cheese product 

$1.00 off one Kashi steam meal 

$0.75 off TWO MorningStar Farms Veggie Foods 

$1.00 off 1 Woolite Pet Oxygen Stain Remover 

$1.00 off one BISSELL Deep Cleaning Formula 

$1.00 off Windex Multi-Surface Glade Magic Meadow Cleaner 

$20.00 off Bionaire or Holmes aer1 Ready 

$10.00 off any Holmes or Bioniare aer1 Ready 


Pin It

Deals:

(clicking links helps fund this blog)