Monday, September 26, 2011

Book Birdhouse

{Book Birdhouse}

 This was something else I saw on pinterest that I knew I just HAD to do. I Love books and have trouble getting rid of them. So finding another use for them is great. I took pictures AFTER I had done it. So I didn't take a picture of the hard cover, but I just took a pair of scissors and cut the binding to get the cover off.

 Ok so you start off folding a page in half vertically


 Then fold the top corner down till it touches the spine- like you are dog-ear marking your page.
 Now I took this picture to show you the folds in the 2nd page. You are going to alternate your folding.
 First take the bottom of the page and fold it up towards the spine of the book,
 then take the top of that same page and fold it down towards the spine, so that it looks like the picture below.

 Then you just keep alternating the 2 folds until you run out of pages.
Your final project will look like a birdhouse. Some people add little dark circles to look like an opening. I didn't do that because I was happy with it the way it was. You can't tell from this picture, but it is only half of a birdhouse really. It wasn't a very big book, an old elementary school book about Abe Lincoln growing up. So it works perfectly butted up against a wall on top of my writing desk.

And just so that you don't have to scroll back up to the top for the "pretty" picture I will include it again here at the bottom.


Isn't it just so cute!


Now so I can give you an idea- this took about as much time as it takes me to do a Tutu, 1/2 hour to an hour. I just folded while I relaxed and watched TV. I did several projects this same day/weekend. For example, the window pane, the stool recovering, the kitchen rearrangement, the wreath..... If you have just a little bit of time, and plan ahead you can get a lot of projects done. Its hard to manage it sometimes being pregnant and having 2 kids under 4. I usually try to get things done while my littlest is napping. And thankfully the 4 year old likes to help.


Linking up to:

The Lettered Cottage

Wednesday, September 21, 2011

Fall Wreath

Fall Wreath Project

 
I have seen these wreaths all over the place on Pinterest. So I guess this is also part of a Pinterest Challenge lol, but It was only inspired by one there. I did mine without looking at any tutorial, just using what I had on hand and figuring it out. So for me this project was totally FREE!

I went through my supplies and first off found this straw wreath form. It was thicker than the metal forms many people are using, but you don't argue with Free, ya know.

 This is a quick pic I took to show you my basic supplies, minus a few other fabric swatches I used later, but you will see those in a bit. Just scissors, and my striped outdoor fabric. I have a HUGE roll of this fabric I grabbed up at Hancock Fabric a couple years ago when outdoor fabric was 50% off. I have covered patio cushions and such with it and used leftover scrap on this so I didn't even cut off of my roll.
 You see here the length I used to tie around. I did make it a bit thinner so it would go further.
 

 just a closer shot so you can see how I tied it around, just a basic knot.
 and a closer look at the length of my fabric. I just really eye-balled it. Wanted it to have just a bit of fabric hanging over once it was knotted.
 I frayed the ends. All the ends, I just like the look of frayed fabric on wreaths like this. Something about Fall!
 more fraying- sorry my daughter liked helping and told me I needed to take another pic
 And this is where I usually felt it was frayed enough for me. Your choice if you do it.
 I had some plain burlap looking fabric that I had used on my window pane project, and used some scrap from that, and then ran across this brown on beige flowery patterned fabric that I thought would look good on it too. So Here is a quick hang on the door to see how it looks. You can see some of the straw wreath peeking through, so I think it works since it is fallish as well, you couldn't really do that with the metal wreath forms.

 This one just looks better because I adjusted the color on it and got a little closer


And just one more shot of the final project:
I like it, think it works well at our house and was super easy and quick to do!

Did any of you do any wreaths for Fall or Halloween? Care to share any pictures?

Thursday, September 15, 2011

{High-Five worthy Dinner}

I am so excited about the super easy-little ingredients- little work- but tasty dinner I made last night. I am trying to find basic recipes, meaning non-processed foods, just  meats, veggies, and fruits, since my son is allergic to corn, dairy, nuts, eggs and bananas so far. We need to keep it basic and let me tell ya reading the labels will make you crazy. The corn allergy is a new one to us and we already avoided eggs and nuts b/c of the high possibility of it. But having already eliminated dairy, and then adding corn to the list really limited our pre-packaged food choices. Do you know how much corn is in products; corn flour, corn starch, high fructose corn syrup, corn oil, and the list goes on. It was actually worse than the dairy. Do a search for a corn allergen list to see it. WOW. So we are going to just keep it basic at our house so we know what we are giving him and don't have to worry about the 4 year old sharing her food.

Last nights dinner was found by doing a search for easy chicken leg recipes. Yep that was all, and then picking one that sounded yummy, got good reviews, was really a no-fail (according to the author), and was simple to make (ingredients and time). So this one sounded yummy, and boy let me tell you, it WAS!


I did not save the link, and am sorry to say I didn't take pictures. I was not expecting it to be as much of a hit as it was.


Crispy Rosemary Chicken and Fries

Prep time 15 Min
Cook time 1 Hr
Ready in 1 Hr 15 Min
This is a one pan meal that's in the oven in 15 minutes. * did not have fresh herbs so used dried. Rosemary(didn't have any used basil instead), garlic, and oregano create a mouth watering aroma.  Potatoes are crispy like french fries, just serve with ketchup. Kids just love this! (we had sweet potatoes on hand so used those)
Ingredients
6 chicken legs
3 small red potatoes, quartered ( substituted 2 sweet potatoes)
1/4 cup extra-virgin olive oil, or as needed
1-1/2 teaspoons chopped fresh rosemary (used dried basil)
3/4 teaspoon chopped fresh oregano (used dried)
3/4 teaspoon garlic powder (used garlic salt)
salt and pepper to taste

Directions
Preheat the oven to 375 degrees F (190 degrees C).
Place chicken and potatoes into a large bowl. Pour olive oil over them, and stir to coat. Scatter the chicken and potato pieces in a large baking dish, or cookie sheet with sides. Sprinkle with rosemary, oregano, garlic powder, salt and pepper.
Bake for 1 hour in the preheated oven, uncovered. Baste during the last 15 minutes for extra crispness.

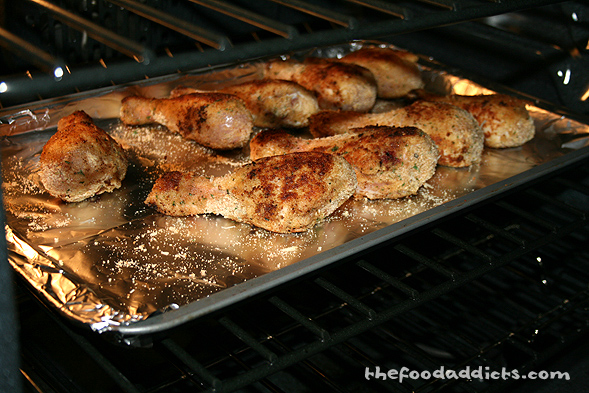
I did a quick google search for a few pictures that would show you what the food looked like and these are pretty darn close.

Really totally that was it. Hubby cut up the sweet potatoes for me, we used 2 cookie sheets cause we knew we would all love the sweet potatos and did more. We put everything- the sliced sweet potatoes and chicken legs in a large metal bowl and then drizzled a lot of olive oil over it and hand tossed for a good coverage. Then we took the chicken out and placed on the cookie sheets- I did not grease the cookie sheets b/c of all the oil that was used. The seasonings were sprinkled over the chicken but put in the bowl for the chips and tossed together. Then the chips were added to the space left on the chicken cookie sheet and the rest put on the 2nd cookie sheet.

We put them in the oven, set the timer and relaxed. Hubby was surprised it was so simple. Me too. I washed my hands off b/c of the oil and raw chicken, cleaned up the kitchen, and set the table. Oh and B-T-dubs (sorry that means BTW, or by the way, I just had to steal it from Sherry @young house love) The girl has a way of coming up with some funny sayings. Anyway, we changed up the kitchen this past weekend. see below for more of that.

When it was done, it smelled So yummy. Some of the sweet potatoes had turned a black color but tasted really good still, though the kids wouldn't eat them, they were like carmelized ( then again, I like my marshmellows flame broiled, so perfect to me). Hubby loved the ones that were sitting in the juices from the chicken and were not completely crisp, and both kids loved them. The chicken legs were also a big hit. That was what they gave me a high five for after the first bite. Now it did have a crisp skin because of the basting with olive oil towards the end of cooking, and man it was well worth it. The chicken was golden and juicy. The herbs added the perfect boost of flavor without being overboard. Highly recommend this recipe.


Ok, so now onto my kitchen change up. I am really bad about remembering to take before pictures. I guess I assumed I had pictures I could show of the kitchen before or of the dining room, but NO. So I have a few random pictures that show parts of my kitchen lol, so bear with me, mmm k.

Ok so here is a picture of our kitchen with hubby and my model at his 30th birthday (Vegas themed) she is playing with the leftover decorations.

 And another angle of the kitchen at my 30th birthday party (80's themed)


You can see the cherry cabinets, the dark granite countertops, glue down tile floor, so you see its a "nice" almost formal kitchen.  We have gone through 2 different tables in this kitchen nook. One from our first home, a townhouse with wrought iron and glass. It was too wide and did not give enough room for us to fully use it, so we sold it, and brought down a tall pub table and chairs, which was not working with a baby. It was too tall for her to reach the table in her high chair, and we were not comfortable strapping the portable high chair into one of the stools. Then when she no longer needed that, we didn't trust her sitting still in it so high up, besides her falling out or kicking it from the table one too many times.

 So, I pulled a plan off of Ana White's page. www.ana-white.com. And built this table. It Still is not stained or painted, just couldn't decide. This was my first building project like this. Hubby did not think I could do it, and was laughing at me. He did cut all the pieces for me and left me alone. I was pregnant at the time, and built this All by myself within 3 hours. It is being used above with a tablecloth over it. Works perfect. It will sit 6-8 easily in our home, and was something that I didn't care if it got dirty or messed up. It was built with scrap wood from my Father in Law who is a carpenter.
 Here it is being used at Halloween last year to carve pumpkins. You can see it is uncovered and we just put plastic down. It fit our lifestyle and being able to mess it up for projects, and physically fit in our room, though was not the aesthetic I was hoping for.


So we had been tossing around the idea of changing our formal dining room (which has only been used a handful of times- literally) into a playroom/craft room for the kids. And moving the formal table and chairs into the kitchen. I worried it would not look right with a formal table in the kitchen and talked to my friend Kristen over at The Shabby Shack and checking ideas on pinterest and Finally realized that our kitchen is more of a formal kitchen anyway. So I measured to make sure it would fit, decided to take the leaf out and only use 4 chairs for now, and hubby moved it around for me.


So, I have to say I.LOVE.IT! I think it pulls the kitchen together. We enjoy using it. We use it everyday now. My daughter likes to pretend we are eating at a restaurant, which makes me laugh. I actually think we may be able to add the leaf back in and the other chairs, but we will wait on that. It works great for now. What do you think? I moved the table I made into the dining room, so kids can use it as a craft table, or hubby can move it out to his shop to use out there for projects. I still have my formal china hutch and corner hutch in the dining room and need it out cause I am worried about the kids will get into the glass and our decor sitting on top- like the antique iron ( I can just see it falling on a kids head or something ya know). So progress. I have a few more things I want to do, like add some valences to the bay window for some color,  add a lampshade or drum to the light fixture here ala Young House Love seen here:


Ok I think this is the longest post I have ever written. I will let you digest all of that info now. Thanks for reading if you made it this far lol.


Linking up:


Tuesday, September 13, 2011

{ Pinterest Challenge}

So my friend Kelly challenged all of us girls to stop our addiction to Pinterest for a bit and actually MAKE something we pinned. I had several that I wanted to do, so I got to it. I actually got a lot done, but in the interest of Time, and the length that this post already will be, I will only share one today. And probably another tomorrow, and then a few others that I didn't really get before pictures of, so will be shorter or combined posts.


I wish I could get this hung like TODAY, or yesterday I could have put some nice earrings on it, or added some color that I Love. I guess I could have still hung some earrings from it to show you my idea for it. This will hang in our Master Bedroom, and I am going to hang jewelry and pictures from it. My Father in Law has a TON of these in an old building that was his grandfathers old store. This building has some of the coolest stuff in it. I have to wait til winter to get stuff out of it because of snakes and spiders, but I have a list of things I want from it.

 So this is my inspiration image from Pinterest, found here:


Ok so This is how I started this project. I have the cutest lil Vanna White helper. And she loves to pose, can you tell?


These were my basic supplies: staple gun and staples, screen, and the old window pane with the glass already removed.


Don't you just love the chipping paint and cracking, and various paint colors showing through there!
I love how she just Pops up in some pics with a random silly face. So what I did now was unroll and measure the screen to cut it, then just started stapling it onto the window pane. I also stapled it to the inner cross bars so it would stay put and be secure.


This is what it looked like once the screen was attached. And it just needed something. Our bedroom walls are a bright sky blue. I love it, its actually calming, but more so with other things toning it down, like our cherry wood furniture, white curtains, white bedding, etc. So I needed something else on the walls to help tone it down a bit and to add some charm to it. We currently don't have anything hanging on the walls besides the curtains. So definitely needs something.


So I took a piece of fabric I had in my stash that looks like a burlap type print on it and cut it down to fit.

Can you see that textured print? it is not raised at all, just plain cotton fabric. but it meets the need.

Then I got to stapling it down, but I did not staple this down to the pane pieces, just the outside and pulled it tight.


See how tight I pulled it? I didn't need to iron it once I got it secured.

I added the hanging teeth at each top corner. Those are easy, just a hammer and nails needed. These were in a picture hanging kit we already had.

One more gratuitous shot of the chipping paint with the screen and fabric added. I am very happy with it all. It just makes me smile. Hubby is glad to see it being used. 


And well the Final Product, tell me.......what do you think?

I just love how charming it looks. It just fits our home and lifestyle so well.

Do you have any pinterest challenge projects going on? What projects are you working on?


I am also linking this project up at:

Friday, September 9, 2011

{FALL} projects and Decor

It is definitely that time of year~ getting the kids out the door in the mornings now requires light jackets or sweatshirts that leads to warmer afternoons.


Hubby and I will be working on a project inside the house that we hope will make our life with 2 kids easier. Then next project will be the front porch and garden areas. Next weekend will be a busy one with 3 local kids consignment sales, AND the Lincolnton Apple Festival! Hubby and I will be getting there early to buy our fried apple pies and buying the apples in bulk to come home and can apple butter and apple jelly and jam.


Recipe for one can be found here, and I am looking forward to trying to make this myself. There is a trick to doing them, been trying different recipes for years and can't quite get it just right.

So, a few of the projects I am hoping to complete this weekend are also part of a Pinterest challenge from my friend Kelly Hayes. I have also asked all the girls participating if I could share their projects on here as well.

here
 I already have these urns, and have seen these plastic pumpkins at Michaels. 


here

 I also want to frame this printable and hang in the hallway or place on the mantel.

here
I love Love LOVE these birdhouses made from books. I think my 4 year old could help me with these.


from pinterest
I have a project I have been working on similar to this, and I want to add some fabric or maybe burlap behind it for a little extra pop to stand out like this. Can't wait to show you how it turns out.

here

And just for fun, if I can find time to lol, I would love to make one of these.

So, do you think that is enough to do? I am hoping I can get to it all plus our cleaning off the porch, rearranging project hubby and I will be working on.

What is on your crafty agenda this weekend?


Wednesday, September 7, 2011

{All about Fall} Series need Guest Bloggers or Contributors


I have a series that will be starting in the next week and am searching for Guest Bloggers or Contributors to talk about their Fall projects, crafts, recipes, family outings, memory making/capturing, and decor!

Would love to have a Bio and write up about the Blogger and their Blog referred back to.

Send me a message at begintocraft at gmail dot com or begintocraft@gmail.com


Thank you all!

Tuesday, September 6, 2011

{Jarritos Product Review}

The Product:
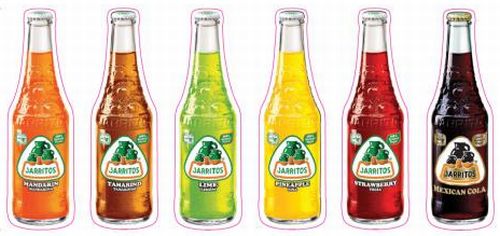
Jarritos is a popular Mexican soft drink that has been around over 60 years. The word jarrito means "jugs" in Spanish and refers to the Mexican tradition of drinking water and other drinks in clay pottery jugs. Jarritos is one of the few soft drinks in the U.S. made of pure cane sugar, instead of fructose corn syrup.


It comes in 11 different flavors:
  • Fruit Punch
  • Strawberry
  • Pineapple
  • Mango
  • Mandarin
  • Mexican Cola
  • Guava
  • Tamarind
  • Jamaica
  • Lime
  • Grapefruit
You can purchase Jarritos from Amazon, or a local Mexican market or grocery store (we have seen them at Food Lion and Walmart locally).


 My Review:
I received 9 glasses of 8 flavors to try, a t-shirt, and CD of music. I had help from my husband and sometimes the 4 year old in trying and tasting them. The flavors I received were

*Mexican Cola
*Pineapple
*Mango
*2 Fruit Punch
*Mandarin
*Grapefruit
*Mandarin
*Lime


First off, you cannot open these bottles by hand. They are not twist off, we had to use a bottle opener. So it already felt kinda special, like getting a glass bottle coke. The first thing we noticed about all these drinks was that they were not as carbonated and not a sweet- as in syrupy sweet, as American soft drinks. It was lighter and fresher. It caught us off guard immediately when we tried the Mandarin- expecting it to be similar to a Sunkist, and it definitely had the orange taste but a more natural orange taste. it let the fruit flavor carry itself without being overly sweet. The one flavor we did not like was the Tamarind. It is hard to describe and just not to my taste. We tried to use it in cooking - when we did black beans and rice, and it didn't leave much flavor so I suppose it did not harm that dish.

The Pineapple and Mango and Lime were similar to the Mandarin in that they taste like the fruit, but not overly sweet. Although the lime was somewhat similar to a Mt Dew. The one drink that was sweet sweet was the fruit punch. It was what I expected it to taste like and was very sweet. I was only able to get one sip of the Grapefruit. Hubby really liked that one- felt it was very similar to a Sundrop. Definitely a great tart taste to it. We felt all these drinks would make great mixers, and would go wonderfully in desserts. Our favorite and the one we felt we would search out and buy most often would be the Mexican Cola. This was like a coke with a slight extra something to it. Like an extra flavor kick. but not much. This drink we passed back and forth tasting and talking about it. It was not overly carbonated and not overly sweet. It really was a nice refreshing drink.

We had always wondered what some of these drinks tasted like when we were out shopping and would see them but we don't often buy lots of soft drinks and don't want to set aside money in our tight budget to buy something we may or may not like. SO I am very thankful for Jarritos for contacting me about reviewing their product. It was very interesting and we definitely enjoyed it.
Follow Jarritos on Twitter and/or "Like" them on Facebook.

Friday, September 2, 2011

My Little Life: mini giveaway!!

Go check out my friend Tonia's blog. She is a new blogger, and has some really neat ideas of things to make. She is doing reviews of craft products that she loves. AND currently is doing a giveaway for some little girl hair clippies. Very easy entry!!


My Little Life: mini giveaway!!: ok so I only need 9 more followers to give away a $25 GC of your choice, so keep spreading the word!! In the meantime, I thought I would ...

Thursday, September 1, 2011

I have not had much time to do any new projects recently, but hoping to soon. I feel bad leaving you all in a lurch with so little relevant or fun posts about projects and tutorials that I figured I would give step by step directions to a couple cute infant dresses/gowns I made.


These are really easy to make and can be made a number of different ways. Ok I am going to break them down more and include the pictures again below so you don't have to keep scrolling up and down to see what I am talking about.

  This one was made using a onesie from a pack I had. I just picked out some fabric that I thought matched the family and the tastes I felt would go well. This dress was made for a little girl named Gibson. Her daddy is a talented amateur guitarist that plays at the campfire gatherings we have often. So guitar prints were used on a number of things I made for her. I took the onesie right at the leg holes and cut it across to make it into a tee. I then took the fabric and measure it around the bottom of the now-cut onesie and gave it another front length so I could give it some extra room to gather it a bit. I then took the cut guitar print fabric to the sewing machine and sewed up the side to create a tube, then turned the bottom up to create a casing in which to pull ribbon through to make it more of a gown, so the feet could be kept up in the fabric but loosened for diaper changes (also because I thought it would be a cute touch.  Once I finished the casing and added the ribbon. Then I lined up the top part of the fabric wrong side out to match up with the bottom edge of the onesie/tee, pinned it into place and attached it using my serger. You could use a zigzag stitch if you don't have a serger. It was super quick and lots of fun.


This pirate girl one was made from a black infant tee I purchased at Hobby Lobby. I happened across this fabric at walmart on the $1/yd rack when they were fasing fabric out.  It is kind of hard to make out in the picture, sorry it was taken with my cell phone and is a little washed out. I took it right before putting it into a gift bag for a baby shower. With this one, I measured the fabric to the shirt the same way, lots of give, so extra fabric used on this one was used to gather it at the waist area. So I gathered the waist area first and then hemmed the bottom edge. I sewed up the side to make it a tube, then pinned the gathered edge to the bottom hem of the tee and serged it into place. I felt it needed a little something else so I had a pink rhinestone girl pirate iron-on that I put into the middle of the black tee for a little girly bling.

 I was very happy with how both of these items turned out. They were the first things I had ever done by "winging it" with an idea and not a pattern. Hope you enjoyed this quick little tutorial. If you have any questions or need clarification please comment or message me.

Deals:

(clicking links helps fund this blog)