Showing posts with label recipes. Show all posts

Tuesday, March 20, 2012

{Homemade bread}


Pin It

I have made this bread recipe from The simple Dollar website, and it is good, just time consuming. As you are doing the kneading and rising on your own and by hand and tracking the time for each step.

Then I saw this bread recipe that uses a bread machine. I had a bread machine once and donated it because though I like the idea of the ease of a bread machine but I hate losing half my loaf because of the mixing blade. 

So I then I found Crystal from Money Saving Mom's tip and recipe where she does the bead in a machine just using the dough cycle then moving it to loaf pan to rise and then bake. Also super easy. So here goes my bread machine recipe trial.


I had my recipe printed out and got all the ingredients out. You add all the ingredients in the specific order to the machine. 
Then I selected 9 for the dough cycle and hit start. And waited. It was about an hour 20 minutes that it did its work.

I then pulled the dough out and formed it into a loaf with a smooth top (not hard just hard to describe) and put it in the loaf pan that I had greased with shortening, and let it rise 20-40 mins. and it looked like this when I put it in my oven at 350 degrees for 30 minutes.


And this is the beautiful, light and fluffy bread that I had available. It has been such a hit already that I have made it 2 more times and will make more tomorrow. 

I also tried the dinner roll recipe that works the same way with just as amazing results. Will share those pics next time I make it as they disappeared so quick ;-)

Wednesday, February 29, 2012

{Yummy Tiramisu Recipe}


Pin It

Tiramisu is one of my favorite desserts. Surprising to my husband because I LOVE CHOCOLATE!


Jayna has a simple recipe posted that I can't wait to try.


Check out her post with the recipe and step by step pictures here at Behind the Studio.

IMG_1144


I will let you know how it turns out when I make it.

Tuesday, November 29, 2011

{Egg, Dairy Free cookie dough recipe}

I Love baking cookies at the holidays. I especially Love sugar cookies and breaking out the cookie cutters and decorations. I can't wait to get my lil man involved this year and let him have at it, but he has so many allergies it is a bit more of a challenge. So to the web I went......


I found this recipe here at Art of Dessert and altered it to fit our extra allergy needs. This is one of the reasons I love blogs, finding great recipes I can easily alter to suit our family needs. I will be making and freezing these to bake through out the season. Also noted- safe to eat the raw cookie dough because there is NO egg so no risk of salmonella. Enjoy!


Don't they look Yummy!
 
photo from Art of Dessert


Egg-Free Sugar Cookies
Makes about 4 dozen cookies
Allergy Note: contains wheat and soy ingredients

3 1/4 cups all-purpose flour
1 1/2 tsp. baking powder
1/2 tsp. salt
3/4 cup butter alternative, softened to room temperature (we use the smart balance OO version)
1 1/4 cups granulated sugar
1 tsp. vanilla extract
1/4 cup milk (we use soymilk)

Sift together flour, baking powder and salt in a bow. Set aside.

In a separate bowl, cream butter and sugar until light and fluffy. Mix in vanilla extract and milk.  Slowly add in the dry ingredients. Divide the cookie dough in half, form them into discs and wrap them in wax paper or plastic wrap. Chill in the refrigerator for about 1 hour or until slightly firm.   

Preheat the oven to 375 degrees F. On a lightly floured surface, take out one of the discs and roll it to about 1/4 inches thick. Cut into shapes and transfer onto a cookie sheet lined with parchment paper or silicone baking mat. This dough can get a little too soft to handle at room temperature so you may have to return it to the refrigerator after rolling and cutting your first batch of cookies. You can bring out the second disc when you're ready to roll and cut the second batch for baking.  Bake for 10 to 12 minutes or until the golden brown around the edges. Cool completely before decorating.


Wednesday, November 9, 2011

{Allergy Free Cake and Icing}

I found this cake recipe that I decided to try with my son who has dairy, egg, corn, and nut allergies. Yep all that, plus a few others...YIKEs. His birthday is coming up and I needed to find something he could eat, and wanted to do a trial run of it to see how it would come out.
 
So she has a blog I have been following because of the allergy issue and she has great recipes (Milk Allergy Mom ) So I went here first looking to see if she had shared a cake, and this is one she makes for her dairy and egg and nut allergy boys. It even has flavor variations!!! Thank you so much Jamie for sharing your allergy journey and this cake recipe. Keep reading, pictures below.

Cake recipe and variations:
This is the chocolate cake recipe:

1.5 c flour
1 c sugar
1/4 cup cocoa powder (for chocolate cake)
1 tsp baking soda
1/2 tsp salt
1 tsp vinegar
1 tsp vanilla
1/3 cup oil
1 c cold water

Heat oven to 350 degrees. Combine ingredients and pour into greased 8" or 9" square pan. Bake in oven until done. Check at about 20 minutes.

Substitutions:

VANILLA CAKE: omit cocoa, double vanilla, add 1/4 cup of more flour

SPICE CAKE: omit cocoa, add 1 Tb pumpkin spice, add 1/4 cup of more flour...and try Pillsbury dairy and egg free cream cheese icing!

ORANGE CAKE: omit cocoa & vinegar, use orange juice for the water, add 1/4 cup of more flour

LEMON CAKE: omit cocoa, use lemon juice for vinegar, can add some lemon extract, add 1/4 cup of more flour
 NOTE; when greasing cake pan- use NON DAIRY spray!! we usually use OLIVE OIL and just rub it on the pan with a flour sack cloth.

Icing Recipe
(From mom2sweetpea in a comment to the above cake)
My son is allergic to eggs, nuts & dairy. Because of him I've started taking cake decorating classes. I make my own buttercream frosting, and it is allergy-free for him too. This recipe is good if you want to do designs on your cakes because it will dry a bit and hold shapes. It is:
1 cup solid white vegetable shortening (I use Crisco-not the butter one!)
1 tsp of vanilla (use clear if you want the frosting to stay white-you can use other flavorings too)
7-8 tsp of water
1 lb pure can confectioner's sugar
Pinch of salt (this keeps it from being super sweet from all that sugar!)

Blend on medium until thoroughly mixed

I also add 3/4 cup cocoa sometimes to make it chocolate!


SO we were all a bit skeptical about how this would taste and turn out. Which is the main reason we wanted to check it out first.


 So they turned out pretty darn yummy. They were very moist, like melt in your mouth moist and we all enjoyed several of them. I will probably cook it a bit longer because they were almost too moist.maybe only 5 minutes or so extra.


As you can tell my girl thought they were really  yummy and had several that she herself decorated.


So yes I am pretty excited to have these to look forward to at my son's birthday party. I am so glad that he will have food that he can eat that is also yummy. I am excited that we will have a chance to make ONE cake or one batter for everyone without worrying someone won't like it or that some food could get contaminated and he could end up with a food he can't have.

Thursday, October 13, 2011

{ Quick Cute Dessert}

I saw this on Pinterest and thought, I can make that simple and easy. I like a good cookie to be crisp or crunchy on the outside and gooey and soft in the middle. This turned out perfect.


I just took pre-made, refridgerated cookie dough- chocolate chip of course, and pressed it into this small dish. I had preheated the oven as the directions on the package said, and just watched it until it looked like I wanted it, mostly that it is browned a bit.


This is what it looked like out of the oven. You can see where it is sunken in the middle- called a soft spot by my granny. This is what I looked for since I like it gooey in the middle.


I snapped another pic of it looking straight into the dish. I plunged a fork into it to check how soft and tender it was. It was just as I liked it.


I couldn't wait to take a bite, so this was the last picture before it was gobbled up. I highly recommend trying this dessert. Hubby and I kept sneaking in the kitchen for another bite. Yumm Yumm!!

Thursday, September 15, 2011

{High-Five worthy Dinner}

I am so excited about the super easy-little ingredients- little work- but tasty dinner I made last night. I am trying to find basic recipes, meaning non-processed foods, just  meats, veggies, and fruits, since my son is allergic to corn, dairy, nuts, eggs and bananas so far. We need to keep it basic and let me tell ya reading the labels will make you crazy. The corn allergy is a new one to us and we already avoided eggs and nuts b/c of the high possibility of it. But having already eliminated dairy, and then adding corn to the list really limited our pre-packaged food choices. Do you know how much corn is in products; corn flour, corn starch, high fructose corn syrup, corn oil, and the list goes on. It was actually worse than the dairy. Do a search for a corn allergen list to see it. WOW. So we are going to just keep it basic at our house so we know what we are giving him and don't have to worry about the 4 year old sharing her food.

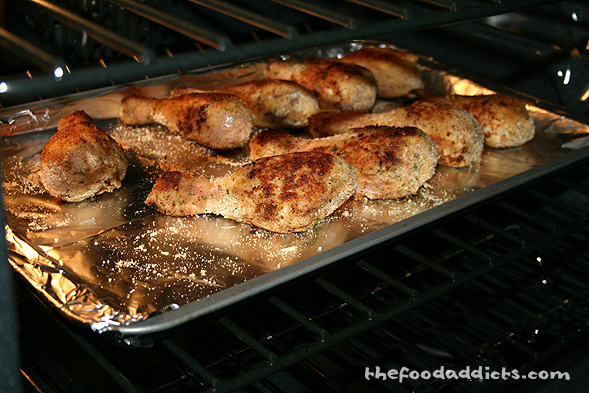
Last nights dinner was found by doing a search for easy chicken leg recipes. Yep that was all, and then picking one that sounded yummy, got good reviews, was really a no-fail (according to the author), and was simple to make (ingredients and time). So this one sounded yummy, and boy let me tell you, it WAS!


I did not save the link, and am sorry to say I didn't take pictures. I was not expecting it to be as much of a hit as it was.


Crispy Rosemary Chicken and Fries

Prep time 15 Min
Cook time 1 Hr
Ready in 1 Hr 15 Min
This is a one pan meal that's in the oven in 15 minutes. * did not have fresh herbs so used dried. Rosemary(didn't have any used basil instead), garlic, and oregano create a mouth watering aroma.  Potatoes are crispy like french fries, just serve with ketchup. Kids just love this! (we had sweet potatoes on hand so used those)
Ingredients
6 chicken legs
3 small red potatoes, quartered ( substituted 2 sweet potatoes)
1/4 cup extra-virgin olive oil, or as needed
1-1/2 teaspoons chopped fresh rosemary (used dried basil)
3/4 teaspoon chopped fresh oregano (used dried)
3/4 teaspoon garlic powder (used garlic salt)
salt and pepper to taste

Directions
Preheat the oven to 375 degrees F (190 degrees C).
Place chicken and potatoes into a large bowl. Pour olive oil over them, and stir to coat. Scatter the chicken and potato pieces in a large baking dish, or cookie sheet with sides. Sprinkle with rosemary, oregano, garlic powder, salt and pepper.
Bake for 1 hour in the preheated oven, uncovered. Baste during the last 15 minutes for extra crispness.

I did a quick google search for a few pictures that would show you what the food looked like and these are pretty darn close.

Really totally that was it. Hubby cut up the sweet potatoes for me, we used 2 cookie sheets cause we knew we would all love the sweet potatos and did more. We put everything- the sliced sweet potatoes and chicken legs in a large metal bowl and then drizzled a lot of olive oil over it and hand tossed for a good coverage. Then we took the chicken out and placed on the cookie sheets- I did not grease the cookie sheets b/c of all the oil that was used. The seasonings were sprinkled over the chicken but put in the bowl for the chips and tossed together. Then the chips were added to the space left on the chicken cookie sheet and the rest put on the 2nd cookie sheet.

We put them in the oven, set the timer and relaxed. Hubby was surprised it was so simple. Me too. I washed my hands off b/c of the oil and raw chicken, cleaned up the kitchen, and set the table. Oh and B-T-dubs (sorry that means BTW, or by the way, I just had to steal it from Sherry @young house love) The girl has a way of coming up with some funny sayings. Anyway, we changed up the kitchen this past weekend. see below for more of that.

When it was done, it smelled So yummy. Some of the sweet potatoes had turned a black color but tasted really good still, though the kids wouldn't eat them, they were like carmelized ( then again, I like my marshmellows flame broiled, so perfect to me). Hubby loved the ones that were sitting in the juices from the chicken and were not completely crisp, and both kids loved them. The chicken legs were also a big hit. That was what they gave me a high five for after the first bite. Now it did have a crisp skin because of the basting with olive oil towards the end of cooking, and man it was well worth it. The chicken was golden and juicy. The herbs added the perfect boost of flavor without being overboard. Highly recommend this recipe.


Ok, so now onto my kitchen change up. I am really bad about remembering to take before pictures. I guess I assumed I had pictures I could show of the kitchen before or of the dining room, but NO. So I have a few random pictures that show parts of my kitchen lol, so bear with me, mmm k.

Ok so here is a picture of our kitchen with hubby and my model at his 30th birthday (Vegas themed) she is playing with the leftover decorations.

 And another angle of the kitchen at my 30th birthday party (80's themed)


You can see the cherry cabinets, the dark granite countertops, glue down tile floor, so you see its a "nice" almost formal kitchen.  We have gone through 2 different tables in this kitchen nook. One from our first home, a townhouse with wrought iron and glass. It was too wide and did not give enough room for us to fully use it, so we sold it, and brought down a tall pub table and chairs, which was not working with a baby. It was too tall for her to reach the table in her high chair, and we were not comfortable strapping the portable high chair into one of the stools. Then when she no longer needed that, we didn't trust her sitting still in it so high up, besides her falling out or kicking it from the table one too many times.

 So, I pulled a plan off of Ana White's page. www.ana-white.com. And built this table. It Still is not stained or painted, just couldn't decide. This was my first building project like this. Hubby did not think I could do it, and was laughing at me. He did cut all the pieces for me and left me alone. I was pregnant at the time, and built this All by myself within 3 hours. It is being used above with a tablecloth over it. Works perfect. It will sit 6-8 easily in our home, and was something that I didn't care if it got dirty or messed up. It was built with scrap wood from my Father in Law who is a carpenter.
 Here it is being used at Halloween last year to carve pumpkins. You can see it is uncovered and we just put plastic down. It fit our lifestyle and being able to mess it up for projects, and physically fit in our room, though was not the aesthetic I was hoping for.


So we had been tossing around the idea of changing our formal dining room (which has only been used a handful of times- literally) into a playroom/craft room for the kids. And moving the formal table and chairs into the kitchen. I worried it would not look right with a formal table in the kitchen and talked to my friend Kristen over at The Shabby Shack and checking ideas on pinterest and Finally realized that our kitchen is more of a formal kitchen anyway. So I measured to make sure it would fit, decided to take the leaf out and only use 4 chairs for now, and hubby moved it around for me.


So, I have to say I.LOVE.IT! I think it pulls the kitchen together. We enjoy using it. We use it everyday now. My daughter likes to pretend we are eating at a restaurant, which makes me laugh. I actually think we may be able to add the leaf back in and the other chairs, but we will wait on that. It works great for now. What do you think? I moved the table I made into the dining room, so kids can use it as a craft table, or hubby can move it out to his shop to use out there for projects. I still have my formal china hutch and corner hutch in the dining room and need it out cause I am worried about the kids will get into the glass and our decor sitting on top- like the antique iron ( I can just see it falling on a kids head or something ya know). So progress. I have a few more things I want to do, like add some valences to the bay window for some color,  add a lampshade or drum to the light fixture here ala Young House Love seen here:


Ok I think this is the longest post I have ever written. I will let you digest all of that info now. Thanks for reading if you made it this far lol.


Linking up:


Thursday, July 7, 2011

Small event planning

I am planning an event for family and friends with my son's upcoming Baptism and Hubby's birthday in a few weeks! Sometimes you hear about 2nd children being treated differently than first, and though it is tough to juggle two and pay them equal attention, I want to do something special for my baby boy! So a small cookout after the ceremony at our home is simple and inexpensive while still being celebratory. It is hot, so though we have plans to put up either a gazebo or screen porch one day, that will not happen by then. We do have a 10x10 white tent we will use, probably on the back deck for some easy shade. We have a sprinkler and kiddie pool for the kids to cool off in while playing by the playground.

Now the food will be fairly simple. Hot dogs and hamburgers, baked beans, cole slaw, pasta salad, and desserts. I am fortunate enough that all the family wants to help, so Hubby and I will provide the meats, condiments and drinks, while family will be making the side dishes listed above and some sweets.


I have to make some type of dessert though, I can't help it. I have a sweet tooth, and Love desserts. So really you can't have too much dessert! I have to share the following recipe with you.


I love a few things from Richella's site.

This cake recipe which she calls the cake that will make you famous, and who can argue, it is a big hit on the blogosphere.


Here are the ingredients you'll need:


You'll also need eggs, oil, and water. Mix up the white cake according to package directions. You can use any cake mix that makes you happy (or, if you're like me, you'll use the one that was on sale).


Prepare two round cake pans; divide batter evenly between the pans. HINT: If you have a food scale, use it to make sure your batter is divided evenly. Otherwise, just eyeball it.


Bake layers according to package directions. Allow the two cake rounds to cool thoroughly.


Meanwhile, make your filling/frosting by combining


1 lb. powdered sugar, sifted
8 oz. sour cream
2 6 oz. packages frozen coconut (find it in the frozen fruit section of your grocery store), thawed


Mix thoroughly.


When cake layers are completely cooled, cut them in half horizontally. You'll be creating four layers. I use a long serrated knife for this process. Don't worry if the layers aren't perfect.


Place one layer, cut side up, on a cake plate. It's best to use a plate with a lip, since your filling/frosting will be fairly runny.


Spread 1/4 of your filling/icing on the first layer. HINT: Again, if you have a food scale, use it to make sure you're using 1/4 of your filling for each layer. You'll have 36 oz. of frosting, so use about 9 oz. per layer. If you don't have a food scale, just eyeball it. . . but if you do have a food scale, it's useful for making this cake just right!


Continue stacking each layer, cut side up, on top of one another, topping each layer with 1/4 of the filling.


When you've stacked the last layer and spread the last bit of filling on top, you may want to sprinkle a bit of flaked coconut (I like Baker's Angel Flake) on top just because it looks pretty.


Now here's the most important part. Cover the cake well (I cover it with plastic wrap first, then also with foil) and refrigerate it for at least TWO DAYS before serving. Three days would be fine, too. But it needs to sit for at least two days to give plenty of time for the yummy filling to sink down into every crevice of the layers--the layers that you placed CUT SIDE UP, remember? After two days the cake will be moist and cold and absolutely irresistible.

I also love her idea here of using a beverage dispenser. It is July after all and it will be HOT, and even though we have a large home, we know we need overflow space outside. And will need lots of cool drinks to keep everyone hydrated. I think this looks So sophisticated, and even something as simple as water with some fruit added for flavor looks So much nicer!

Tuesday, June 28, 2011

How fun: Recipes!

Are you ready for some fun Recipes to try for this 4th of July Weekend!  Now below are a few that I have stumbled across recently and can't wait to try.


Make your own gummi bears
I Love Gummi Bears- always have. and now use my kids as an excuse to buy them lol. can't wait to see how these turn out.


Can you say YUMMY You basically had me wanting to try this when I saw the pop rocks!! I mean how does that not SCREAM fireworks!! This looks so good.

I love Crystal's recipes and am So inspired by her freezer cooking in an hour series. I love the idea of freezer cooking, but find it hard to make time to do it while working FT and trying to spend quality time with my family. Her 1 hour Freezer cooking posts makes it seem much more doable.


IMG_5812

How absolutely yummy does this sound. Looks light and rich, and might make it to hubbys celebration meal this week. This is Not helping my diet plans.


Which of these sound good to you? do you have any other recipes you love?


I am linking up to a few blog hops:


Joining with these other Great Bloggers;

Homemade soda recipes

So the hubby and I are trying to lose weight by eating healthier options. He is having a hard time adjusting to drinking only water even if it has fresh squeezed juice added to it. He likes his soda, and we have been looking for some healthier lower sugar options. We do make an italian soda using soda water or some type of sparkling water that doesn't have sugar or sodium added to it. Then add sugar free flavored syrup to it, and that is a quick easy refreshing drink.

I also found the following recipes for make your own soda. Have any of you ever tried making soda yourself?? How did it turn out? Was it easy, hard??? any recipes to share?


Almost 'Coke'
List of Ingredients
2 T Sugar
1 t Vanilla
1/4 t Cinnamon
1 t Bottled Lime Juice
1 C Club Soda
Recipe
Mix well and add lots of ice.
This will look different than regular cola, but tastes similar.
You can vary the lime juice and sugar amounts to suit your taste.
Makes 1 Cup


Fresh Ginger Ale Recipe
Yield: 12 Servings

2 c Coarsely chopped, peeled Fresh ginger
3 Strips lemon peel, pith removed
1 1/2 c Sugar
3 Quarts chilled club soda
Ice cubes
Put ginger, lemon peel, and 4 cups of water into a 4quart pan. Bring to the boil, and continue boiling, without lid, for about 10 minutes. Stir in 1 1/2 cups sugar and boil for about 15 more minutes. Liquid should have reduced to about 3 cups. Pour through a wire seive and discard the peel and ginger. Cool the syrup, cover and chill for at least an hour.

To serve, pour 1/4 cup of the syrup into a tall glass and add 1 cup of the club soda. Add ice and more soft drink syrup if needed.

Al's Root Beer
Yield: 1 Batch

1 ts Dry yeast
1/2 c ;Water, warm
2 c Sugar, granulated
1 qt ;Water, hot
4 ts Rootbeer extract
Dissolve yeast in 1/2 cup warm water. Dissolve sugar in 1 quart hot water. Mix together dissolved yeast, sugar and root beer extract in gallon jar. Fill jar with warm water and stir until all ingredients are well combined. Cover jar. Set in warm sun for four hours. It will be ready to drink the next day. Chill soft drink before serving.

Tuesday, May 17, 2011

Healthy Dessert Recipes: Cocoa Meringue Cookies

You have got to head over to Healthy Dessert Recipes!
I found her after she friended my blog on a blog hop! AND WOW WOW WOW! can I say that enough?? I mean really you have probably read about my son having a dairy allergy. He is 6 months old and I nurse him and still supplement with hypoallergenic formula. But the boy likes to BF. So I am dairy free. It can be tough because I Love sweets. Chocolate, cream cheese, ice cream, pot lucks- most of those are out of my reach right now. As is most foods since they usually contain butter, cheese, milk products of some sort. Even going to fast food is tough. But I have been lucky to have some nice treats. These cookies already jumped at me when I saw her page. She even has a video tutorial at the bottom of this post on her page. Please check it out. I can't wait to see what else she has on there.

 Cocoa Meringue Cookies


The kids will love these. Don't these look so light and delicious? And they're easy so to make. The cocoa merringue cookie that will satisfy your sweet tooth completely:

Ingredients:
•3 large egg whites
•1/8 teaspoon cream of tartar
•1/2 teaspoon vanilla extract
•3/4 cup granulated white sugar
•2 tablespoons unsweetened cocoa powder

Preparation:
1.Preheat oven to 300 degrees. Line 2 cookie sheets with foil. To start beat in egg whites with your cream of tartar on high speed until soft peaks form. Now slowly add your sugar and beat until peaks form. Blend in the vanilla extract and fold in the cocoa powder. Now drop dolops of the mixture all over your cookie sheet and bake for about 25-35 minutes or until meringues are firm and dry.

Then slide them onto wire racks to cool which will continue to firm them up. You can store them in an airtight container or plastic sealed bag to be served later if you'd like. Yum!

Thanks so much for leading me to your site ExJW33!

Thursday, May 5, 2011

Oh Yum!

I absolutely Had to share this recipe. I is almost lunchtime, and I have such a sweet tooth and am having to be dairy free due to breastfeeding an infant allergic to milk, plus other things we will find out about tomorrow. Anyway I was checking out some of the blogs on the bloghops I posted about in the post just below, and found a great blog for food!   mmmmm, one of my favorite topics, and hobbies. So when I read the ingredients, I was THRILLed to see there is NO dairy in it, and super easy to make! Thanks for the recipe. Be sure to check her site for other cool recipes. I know I am! Oh and BTW I will tell you how it turns out on Monday, cause be sure I will be making this sauce over the weekend!

 Pinapple Sauce

This stuff is fantastic on just about anything. Banana splits, ice cream, waffles. If you haven't noticed yet I"m all about simple stuff. The least amount of work that's going to wow the crowd. This sauce is just that.
Here's what you'll need:

1 Can Crushed Pineapple
1/2 Cup Water
1/4 Cup Sugar
1 Tbsp Corn Starch
Dump all the ingredients into a saucepan. Heat over medium heat and stir until it thickens to your liking. I don't like runny sauces so I make mine a little thicker.
Give it a whirl and then come back here and let me know what you thought of it. At our house we love it!

Wednesday, April 20, 2011

Okra Pickles

r I Love Okra, fried okra, and pickled okra. And love it in soups too. I love growing it and picking it in the garden. I have pickled it before, but this recipe sounds yummy. If you haven't tried it yourself you should try the pickle recipe below. The link to the blog where it is posted is here: Okra Pickles


Okra Pickles


Okra Pickles
3 lbs. okra, whole and about 3” to 4” long
3 c. water
1 c. white vinegar
1/4 c. pickling salt
2 cloves garlic, minced


Wash okra, and pack the okra into hot pint jars.


Combine the remaining ingredients in a medium pot and bring to a boil. Remove mixture from stove and slowly pour over okra into the jars, leaving about 1/2” head space from the top rim of the jar.


Wipe the rims. Put on the hot seal and ring.


Process in boiling water bath for 5 minutes.


Makes 4 pints.

Tuesday, April 12, 2011

Homemade Englist Muffin Recipe

I Love English Muffins, and they can be pretty pricey. There are not many coupons to be found for them either. I like them as sandwiches, or with cream cheese and/or peanut butter. This recipe seems pretty straight forward.


Utah Deal Diva: Helping Utah families live on less!: Homemade English Muffins

Deals:

(clicking links helps fund this blog)